Synopsis
ROS is an open-source project that provides a framework to your robot. It has become an integral part of robots today, and has massively impacted the Robotics Arena. ROS is extremely fascinating to study, but is not easy or beginner friendly.
ROS Theory is an attempt to document the basics of ROS. This documentation will take you through a number of examples to better understand the concepts, and is neatly demonstarted by code and pictures of my terminal.
Table of contents
Introduction
1.1 What is ROS?
ROS stands for Robot Operating System. Although the name implies that it is an OS, it is not. Rather, it is a framework that helps integrate the various parts of a robot by setting up communication between hardware and software of your robot, and between different processes going on within the software.
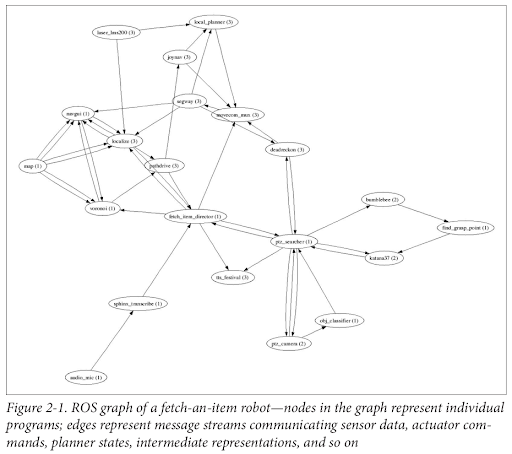
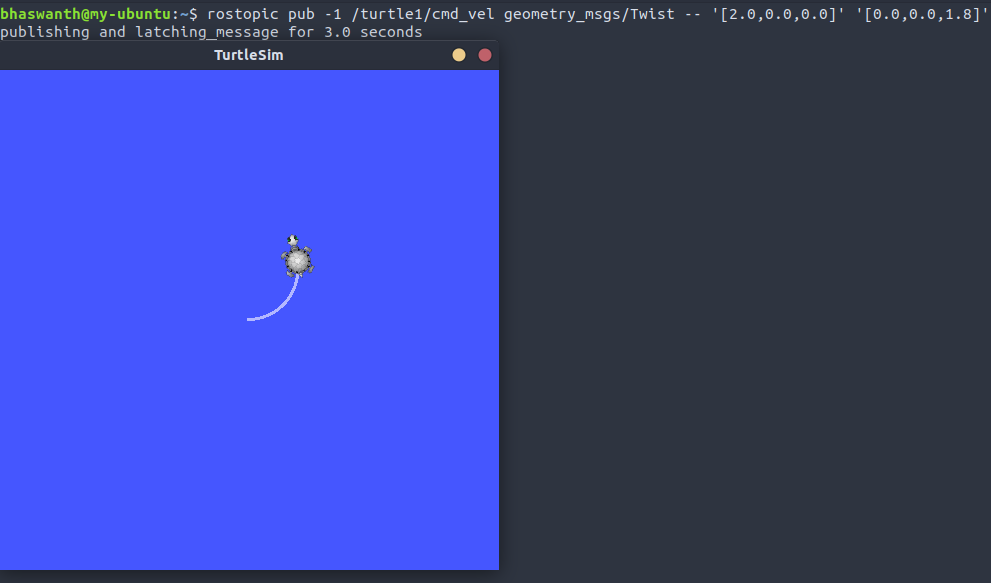
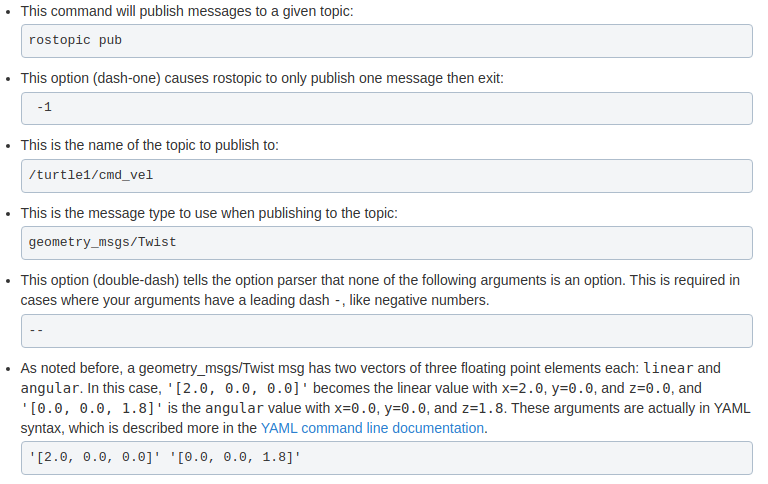
Let us consider the following example in order to understand it better. Suppose you are building a simple robot for a ‘fetch an item’ task, in which your robot needs to navigate a given environment, find the required item and bring it back to a specified location. The robot has various parts that perform different functions such as locomotion and navigation (by the wheels of the robot), computer vision (by the camera on the robot), etc. However, these parts cannot talk to each other directly, due to which the robot will not know when it should stop/resume a certain task assigned to it. This is where ROS comes in. ROS helps integrate these various parts, thereby facilitating easy communication. The different parts now receive messages from other parts, thereby performing their functions more efficiently.
1.2 ROS Graph
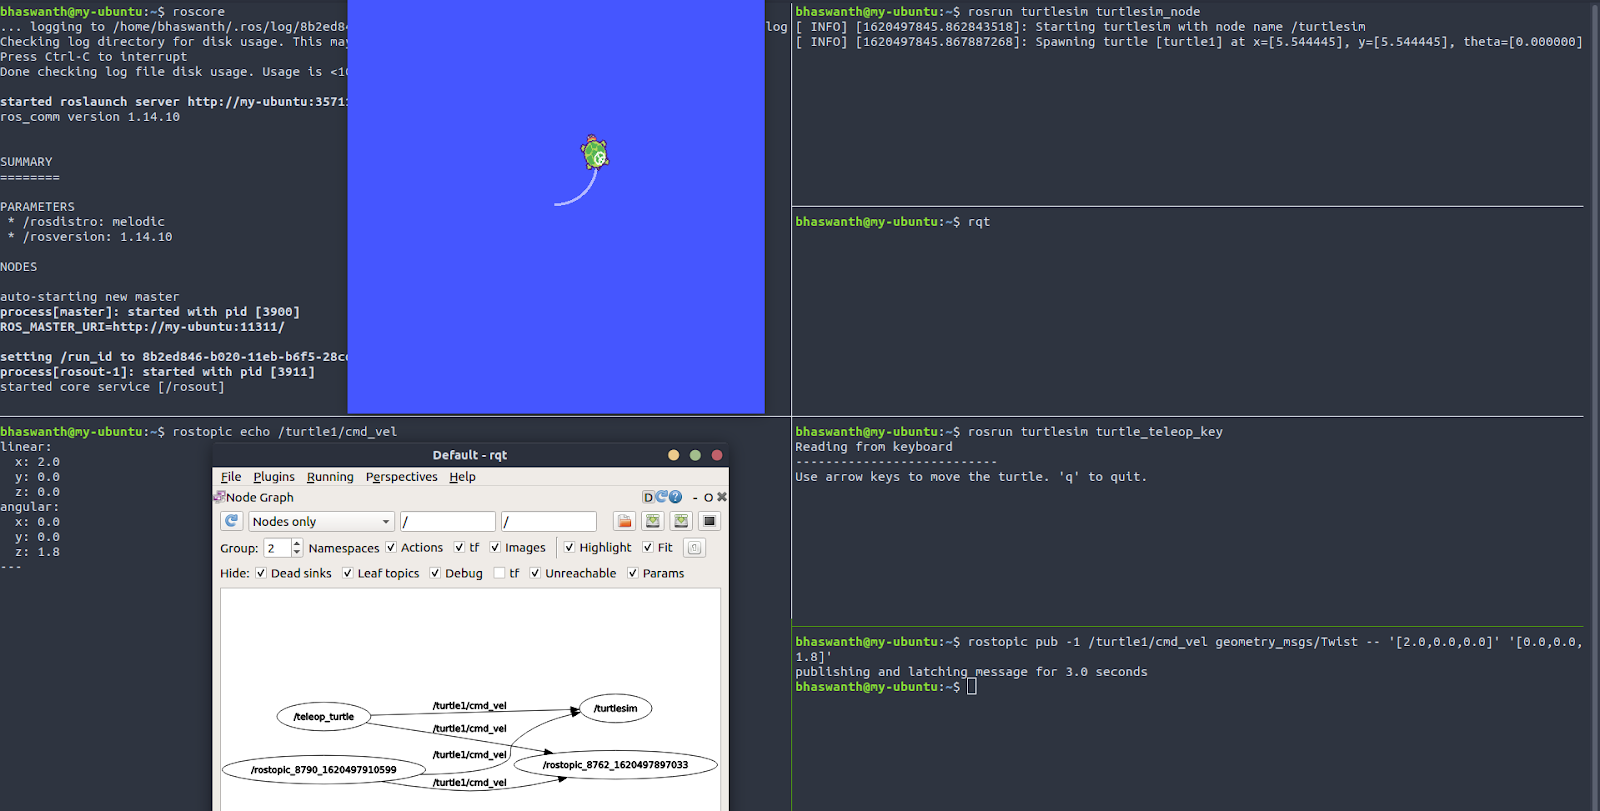
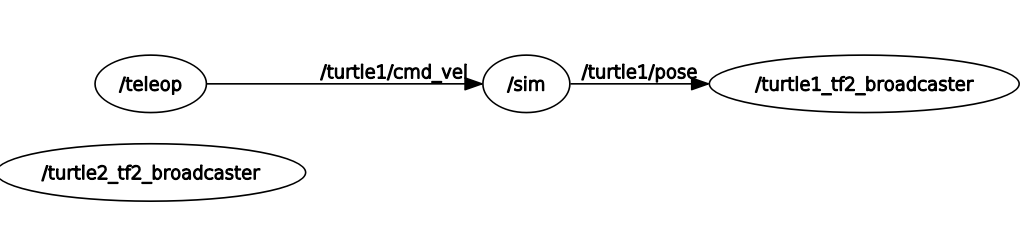
ROS Graph is a convenient way of representing the various programs, messages and message streams of a ROS system as a graph. The various ROS programs, called nodes, communicate with each other by sending/receiving messages. The nodes in a ROS Graph are connected by “topics”, which represents a stream of messages that nodes use to communicate with each other.
1.3 roscore
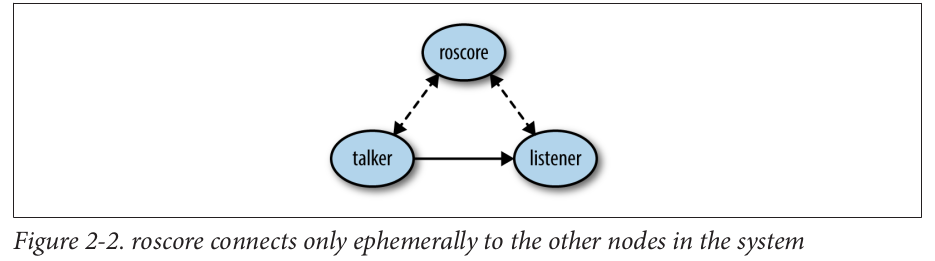
roscore is a service that provides connection information to nodes so that they can find and transmit/receive messages with other nodes. Every node connects to roscore at startup to register details of the message streams it publishes and the streams to which it wishes to subscribe. When a new node appears, roscore provides it with the information that it needs to form a direct connection with other nodes publishing and subscribing to the same message topics.
1.4 catkin
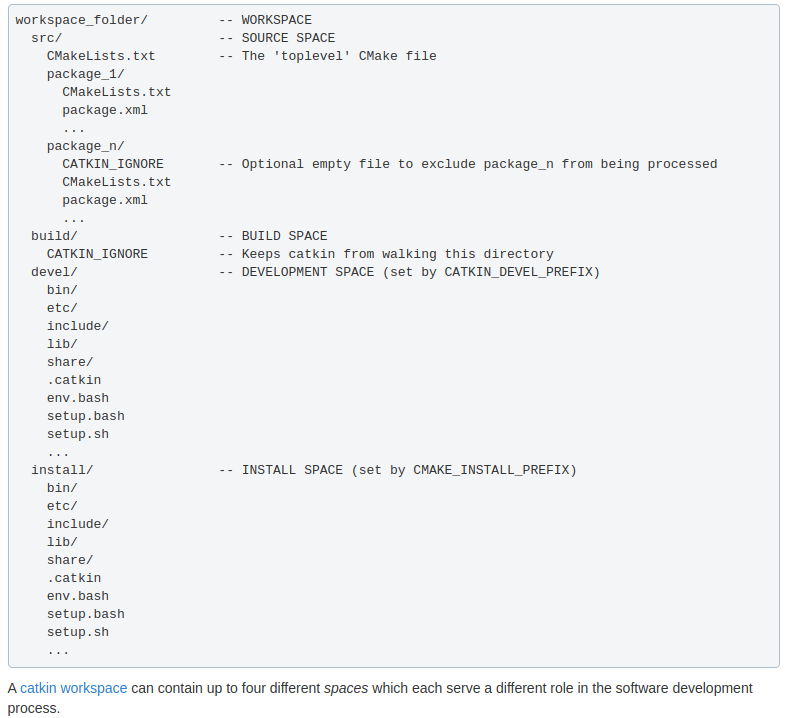
catkin is the ROS build system, which is a set of tools that ROS uses to generate executable programs, scripts, libraries, etc. catkin comprises a set of CMake macros and custom Python scripts. Every catkin directory will contain two files - CMakeLists.txt and package.xml, that you need to make changes in order for things to work properly.
1.5 Workspaces
A workspace is a set of files and directories that contain ROS code. You can have multiple workspaces but you can work on only one workspace at a time.
A catkin workspace is a directory where you build, modify, and install catkin packages. Running catkin_make will create two new directories - devel and build, along with the previously existing src directory.
- Build is where catkin will store the results of some of its work such as libraries, etc.
- Devel contains a number of files and directories, including setup files. Running these setup files configures the system to use the workspace and run the necessary code. Hence it is necessary to source your workspace every time you open a new shell.
1.6 ROS Packages
Documentation - http://wiki.ros.org/ROS/Tutorials/CreatingPackage
Packages are projects that contain your ROS work. A workspace can have several packages, and all of them are located inside the src directory.
For a package to be considered a catkin package, it must meet the following requirements-
- Must contain package.xml file - provides meta information about the package
- Must contain CMakeLists.txt file - Describes how to build the code and where to install it
- Each package must have its own folder
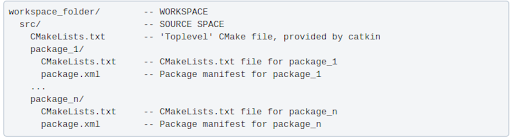
All packages must be created inside
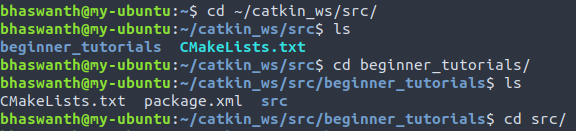
~/catkin_ws/src
1.6.1 Creating a catkin package
To create a package the following syntax can be used:
catkin_create_pkg <package_name> [depend1] [depend2] [depend3]

On creating a new package, the CMakeLists.txt file, package.xml file and the src directory come built-in automatically.
1.6.2 Building the catkin workspace
Once a package has been created, it needs to be compiled in order for it to work.
catkin_make- Will compile the entire src directory and needs to be issued only in thecatkin_wsdirectory.catkin_make --only-pkg-with-deps <package_name>- Will only compile the selected package.
To add your workspace to the ROS environment, you need to source the generated setup file.

Once the package has been created, the Python nodes can be saved in the src directory of the package.
1.6.3 Package dependencies
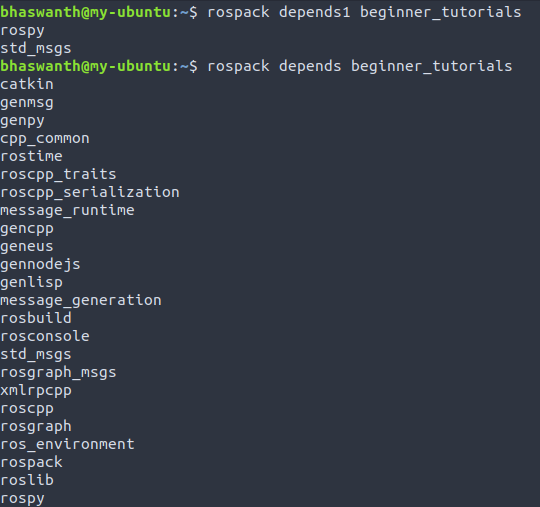
rospack depends1 beginner_tutorials returns a list of the first-order dependencies
rospack depends beginner_tutorials returns a list of all dependencies, direct and indirect.
These dependencies are stored in the package.xml file.
1.7 package.xml
Documentation: http://wiki.ros.org/catkin/package.xml
The package.xml file provides meta information about the package such as package name, version number, authors, etc.
What does a package.xml file contain?
- <name> - The name of the package
- <version> - The version number of the package (required to be 3 dot-separated integers)
- <description> - A description of the package contents
- <maintainer> - The name of the person(s) that is/are maintaining the package
- <license> - The software license(s) under which the code is released.
1.7.1 Dependencies
These four types of dependencies are specified using the following respective tags:
- <buildtool_depend>: Build Tool Dependencies specify build system tools which this package needs to build itself. Typically the only build tool needed is catkin.
- <build_depend>: Build Dependencies specify which dependencies are needed to build this package.
- <run_depend>: Run Dependencies specify which dependencies are needed to run code in this package, or build libraries against this package.
- <test_depend>: Test Dependencies specify only additional dependencies for unit tests. They should never duplicate any dependencies already mentioned as build or run dependencies.
ROS Tools
2.1 rosbash
Documentation- http://wiki.ros.org/rosbash
rosbash is a package that contains some useful bash functions and adds tab-completion to a large number of the basic ROS utilities. When you source your setup file, you will implicitly get all bash-specific commands.
rosbash includes the following command-line utilities:
- roscd - change directory starting with package, stack, or location name
- rospd - pushd equivalent of roscd
- rosd - lists directories in the directory-stack
- rosls - list files of a ros package
- rosed - edit a file in a package
- roscp - copy a file from a package
- rosrun - run executables of a ros package
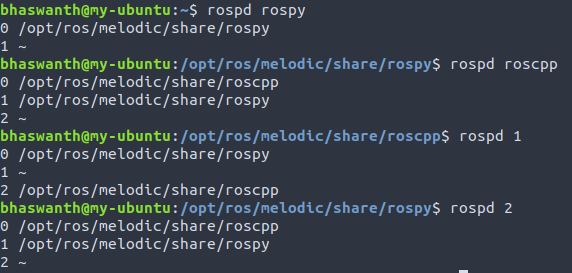
rospd: rospd is the pushd equivalent of roscd, that allows you to navigate between different ros directories by keeping the multiple locations in a directory-stack, and allowing you to jump back to a ros directory that you were previously working on.
![]()
rosed: rosed allows you to edit files in a ROS package by typing the package name and the name of the file that you want to edit.
![]()
roscp: roscp allows you to copy a file from a ROS package by specifying the package name and the name of the file that you want to copy.
![]()


2.2 Common File system tools
rospack:
Documentation- https://docs.ros.org/en/independent/api/rospkg/html/rospack.html
rospack is a command-line tool that is used to get information about ROS packages available on the filesystem. Below are listed some common rospack options-
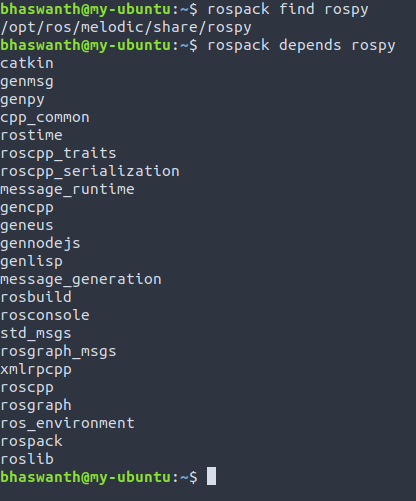
rospack find- returns the absolute path to the packagerospack depends- returns a list of all the package’s dependencies, direct and indirectrospack depends1- returns a list of the package’s primary dependenciesrospack depends-on- returns a list of all the packages that depend on the given packagerospack export- returns flags necessary for building and linking against a packagerospack list- returns a list of all ROS packages on the filesystem![]()
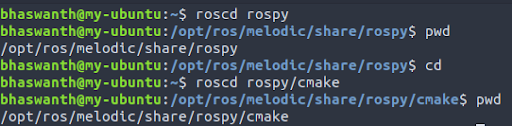
roscd:
roscd allows us to change directory or subdirectory using a package name, stack name, or special location. You can only move to the packages installed into your ROS system.
![]()
roscd log will take you to the ROS directory that contains log files. If no ROS program has been run yet, it will yield an error saying that it does not exist.
![]()
rosls:
rosls allows you to view the contents of a package, stack or location.
![]()
rosparam:


2.3 rosrun
rosrun is a ROS command-line utility that searches for a package for the requested program and runs it.
Syntax-
rosrun <package> <executable>

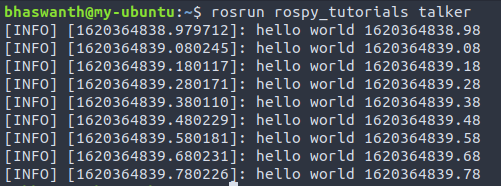
rosrun displays a sequence of timestamps, which in the above picture, prints the string ‘Hello World’ 10 times per second. This reduced frequency helps in recognizing any changes in the messages.
2.4 roslaunch
Although rosrun is great for starting single ROS nodes, most robot systems end up running tens or hundreds of nodes simultaneously. Since it would not be practical to call rosrun on each of these, ROS includes a tool for starting collections of nodes, called roslaunch.
roslaunch is a command line tool that helps run several nodes at a time, instead of using rosrun for each individual node. Syntax- roslaunch PACKAGE LAUNCH_FILE
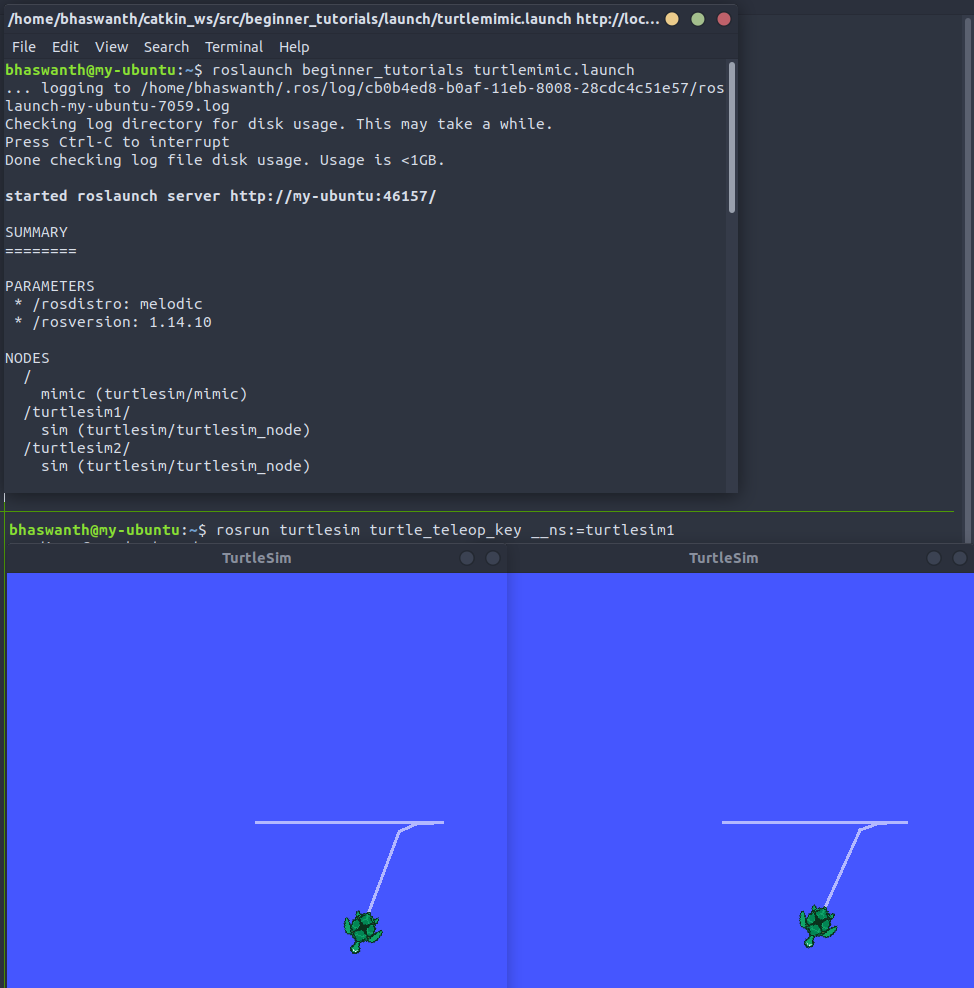
roslaunch operates on launch files instead of nodes. Launch files are XML files that are a collection of nodes along with their topic remappings and other parameters. These files have the suffix .launch.

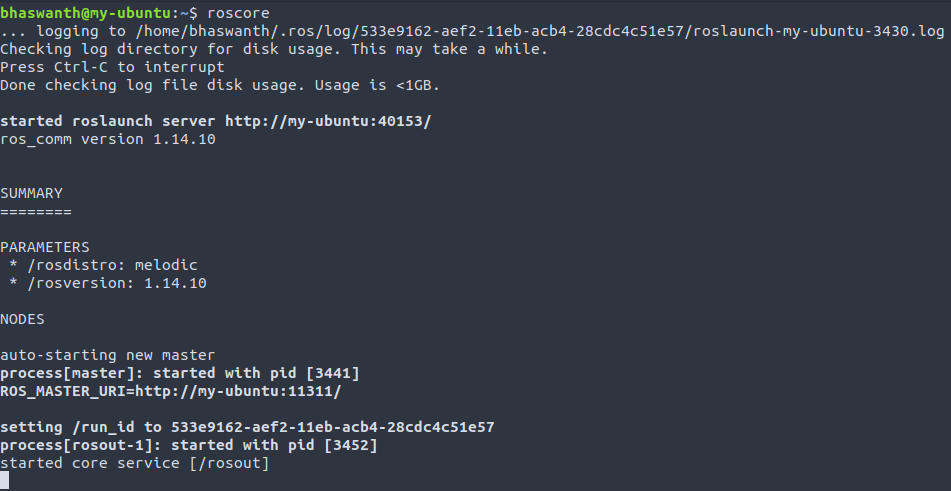
roslaunch includes several other features such as the ability to launch programs on other computers in the network via ssh, to automatically respawn nodes that crash, etc. roslaunch will also automatically run roscore, if it doesn’t already exist. However, pressing Ctrl+C will exit roscore as well, along with roslaunch.
2.4.1 Creating a launch file
1
2
3
4
5
6
7
8
9
10
11
12
13
14
15
16
<launch>

  <group ns="turtlesim1">
    <node pkg="turtlesim" name="sim" type="turtlesim_node"/>
  </group>

  <group ns="turtlesim2">
    <node pkg="turtlesim" name="sim" type="turtlesim_node"/>
  </group>

  <node pkg="turtlesim" name="mimic" type="mimic">
    <remap from="input" to="turtlesim1/turtle1"/>
    <remap from="output" to="turtlesim2/turtle1"/>
  </node>

</launch>
The launch tag <launch> is used to identify the file as a launch file. Lines 3-9: starts two instances of the same node Lines 11-14: start the mimic node with the topics input and output renamed to turtlesim1 and turtlesim2. This renaming will cause turtlesim2 to mimic turtlesim1.

2.5 ROS Nodes
A node is a ROS program that performs a certain task. Differnent nodes communicate with each other by sending messages through topics.
2.5.1 Launching a node
Syntax-
rosrun <package_name> <node_name> __name:=new_node_name __ns:=name_space topic:=new_topic
2.5.2 Controlling 2 turtles using different keyboards
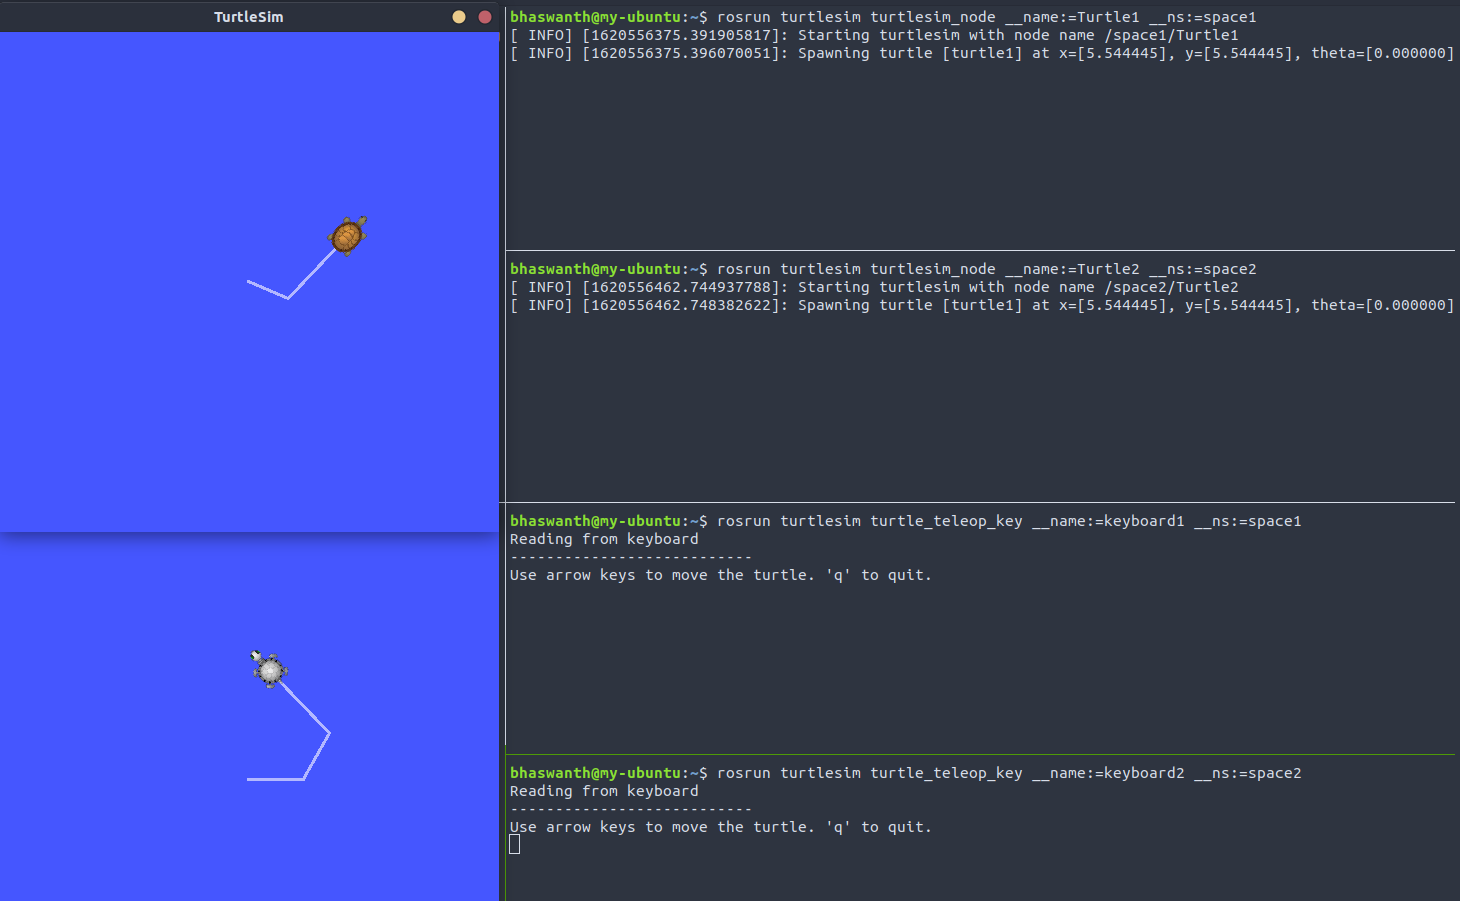
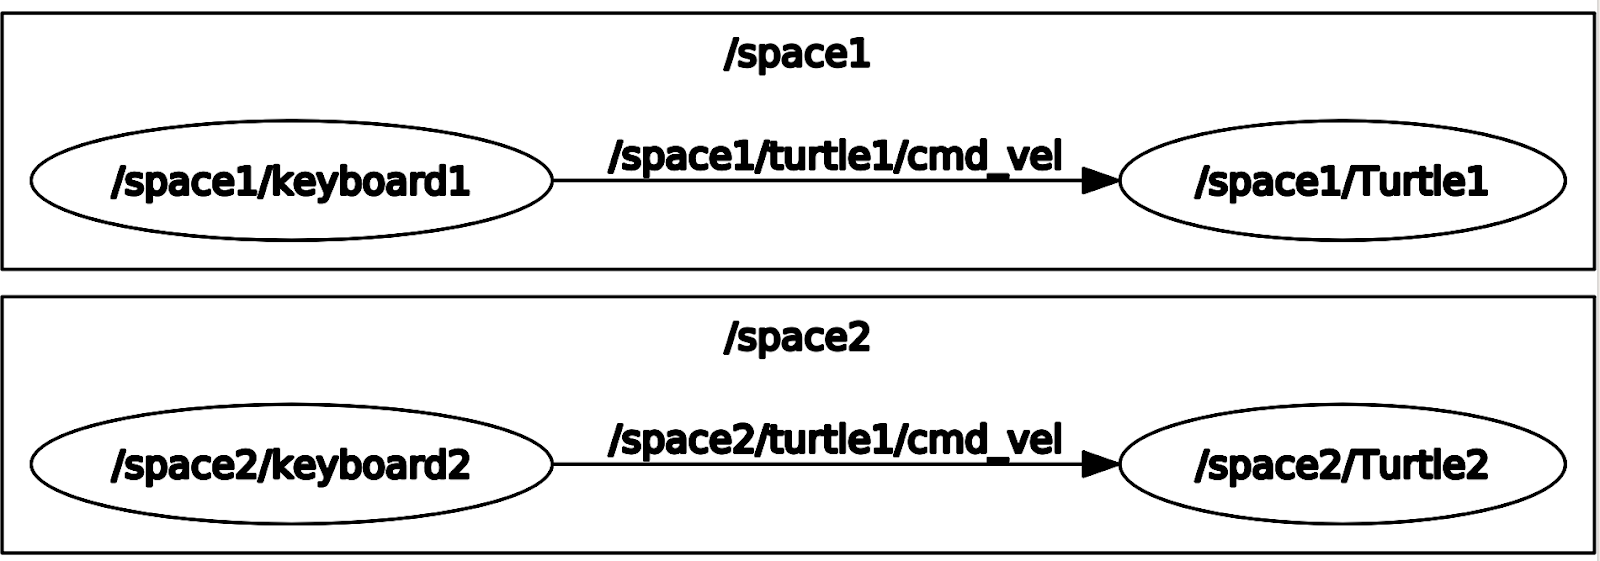
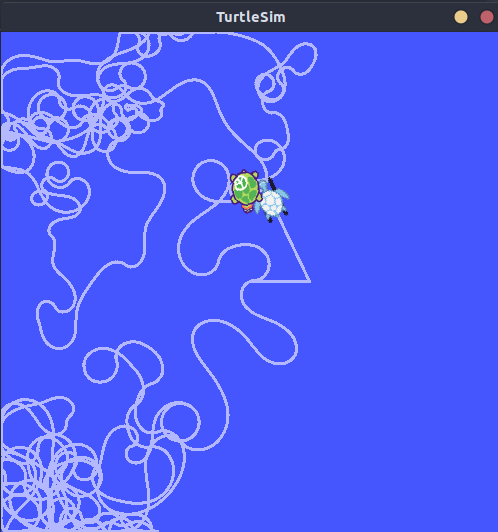
NOTE - We cannot have 2 turtlesims in the same namespace. Take a look at the below image to see what happens if we initialize 2 turtlebots in the same namespace.

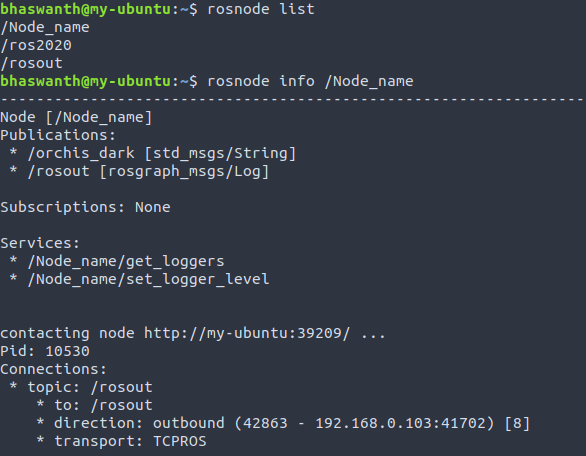
2.5.3 Using rosnode
The rosnode command is used to display information about ROS nodes that are currently running.
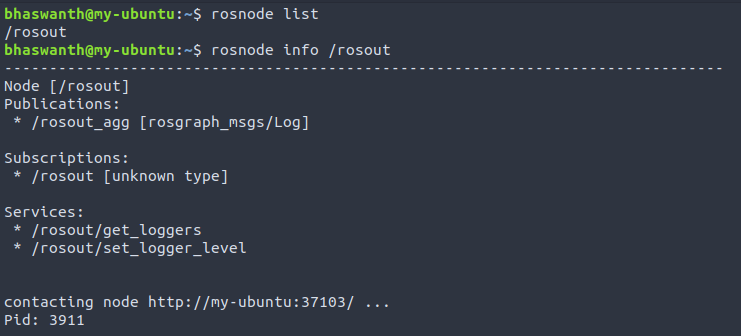
rosout documentation - http://wiki.ros.org/rosout
ROS Topics
ROS Topics represent a stream of messages that connect two or more nodes. The nodes act as publishers or subscribers of messages - publisher nodes send messages through topics and subscriber nodes receive the messages transmitted through a particular topic.
A publisher node would have to register the topic name and the type of messages, and only then it can publish to a topic.
A subscriber node would make a request to roscore to get details about a topic in order to receive the transmitted messages sent through it.
In ROS, all messages on the same topic must have the same data type. Any number of nodes can publish to a topic as long as they have the same message type.
A ROS Topic cannot be published without initializing a ROS Node.
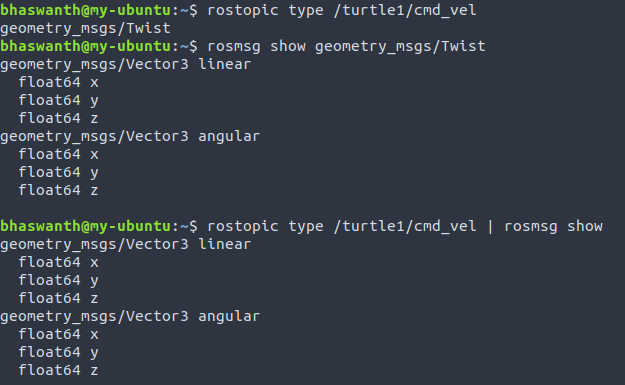
3.1 Using rostopic
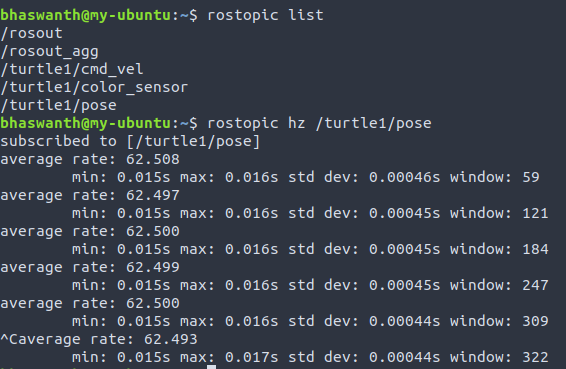
The rostopic command is used to display information about ROS topics that are currently running.
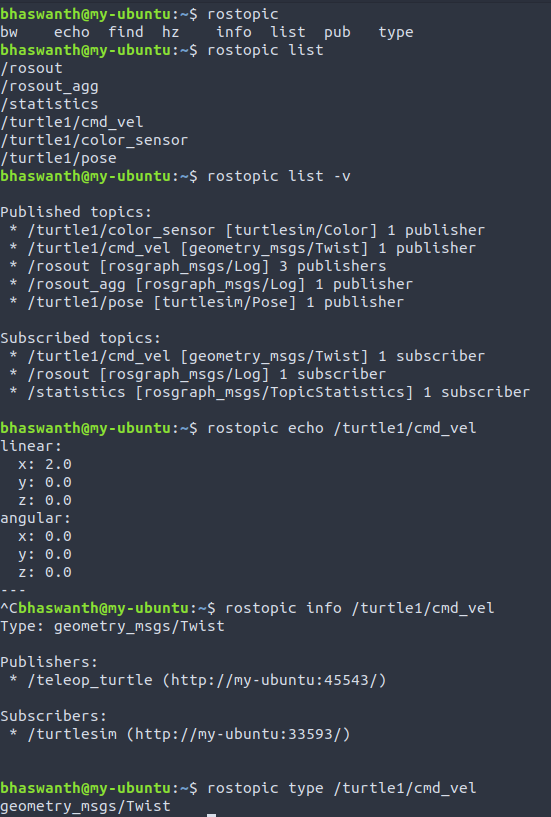
rostopic hz reports the rate at which data is being published. The below image tells us that turtlesim is publishing data about our turtle at the rate of 60 Hz.
ROS Messages
4.1 ROS msg
The message definition file has an extension of .msg and all such files need to be located inside the msg directory of a package.
4.2 Creating a ROS msg

Now we need to make sure that the msg files are turned into source code for Python, C++, and other languages. Open package.xml and make sure the following lines are uncommented.
1
2
3
<build_depend>message_generation</build_depend>
<build_export_depend>message_runtime</build_export_depend>
<exec_depend>message_runtime</exec_depend>
Now we need to make changes to the CMakeLists.txt file.
1
2
3
4
5
6
7
# Modify the existing text
find_package(catkin REQUIRED COMPONENTS
   roscpp
   rospy
   std_msgs
   message_generation
)
1
2
3
4
catkin_package(
  ...
  CATKIN_DEPENDS message_runtime ...
  ...)
1
2
3
4
5
add_message_files(
  FILES
  Message1.msg
  Message2.msg
)
1
2
3
4
generate_messages(
  DEPENDENCIES
  std_msgs
)
Now since we have made a few changes to our package and created new files/directories, we need to compile out workspace by running catkin_make or catkin_make --only-pkg-with-deps <package_name>.
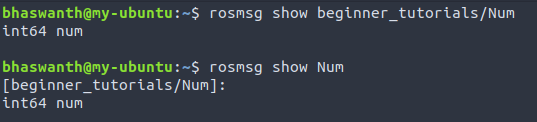
4.3 Using rosmsg
Documentation - http://wiki.ros.org/rosmsg
4.4 Publishing to a Topic
1
2
3
4
5
6
7
8
9
10
11
12
13
14
15
#! /usr/bin/python2

import rospy
from std_msgs.msg import String
import time

rospy.init_node('Node_name',anonymous=True)

pub = rospy.Publisher('/orchis_dark', String, latch=True, queue_size=10)

r = rospy.Rate(10)

while True:
	pub.publish('Current time: {}'.format(time.time()))
	r.sleep()
4.4.1 Code explanation:
Line 1: #! /usr/bin/python2 is known as the shebang. It lets the kernel know that this is a Python file and that it should be passed into the Python interpreter.
Line 3: import rospy appears in every ROS node and imports some basic functionalities, classes and functions.
Line 4: this line allows us to reuse the std_msgs/String message type for publishing.

Line 8: This is used to initialize a ROS node and the node takes the name that you give it. anonymous = True ensures that you have a unique name by adding random numbers to the end of name.
Line 9: pub here is an object of the class Publisher, and allows us to publish to any topic of any message type that you give it. queue_size limits the amount of queued messages if any subscriber is not receiving them fast enough.
Line 11: This line creates an object r of the class Rate. When r.sleep() is called, it sleeps just long enough for the loop to run at the desired rate. When the argument 10 is passed, it goes through the loop 10 times per second.
Line 14: This is used to publish the desired message to the topic.
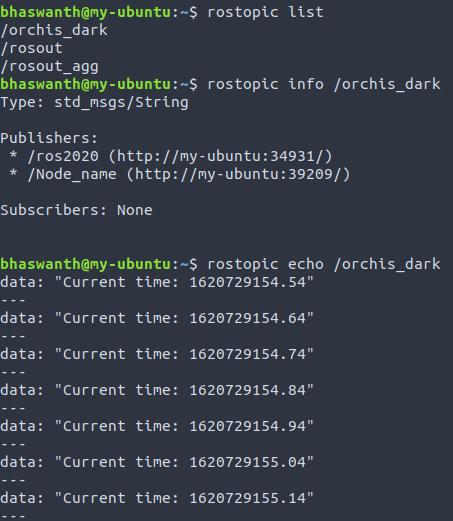
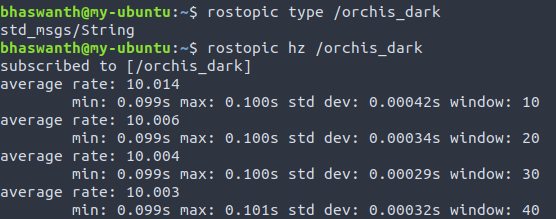
rostopic hz tells us the rate at which messages are being published. Here we see that it is being published at a rate specified by the argument in rospy.Rate(arg).
4.5 Subscribing to a Topic
1
2
3
4
5
6
7
8
9
10
11
12
13
#! /usr/bin/python2
import rospy
from std_msgs.msg import String
rospy.init_node('simple_subscriber', anonymous=True)
def function(my_string):
print(my_string.data)
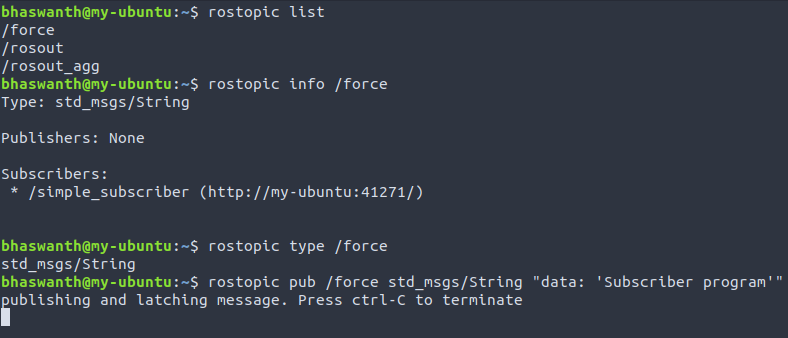
rospy.Subscriber('/force', String, function)
rospy.spin()
4.5.1 Code explanation:
Line 1: #! /usr/bin/python2 is known as the shebang. It lets the kernel know that this is a Python file and that it should be passed into the Python interpreter.
Line 3: import rospy appears in every ROS node and imports some basic functionalities, classes and functions.
Line 4: this line allows us to reuse the std_msgs/String message type for publishing.

Line 6: This is used to initialize a ROS node and the node takes the name that you give it. anonymous = True ensures that you have a unique name by adding random numbers to the end of name.
Line 8-9: This is a callback function. Once a node has subscribed to a topic, everytime a message arrives on it, the associated callback function is called with the message as it’s parameter.
Line 11: In this line, we subscribe to the topic, giving it the name of the topic, message type and callback function as its arguments.
Line 13: This basically instructs ROS to loop over again, once a subscription has been made.
Behind the scenes, the subscriber passes this information on to roscore and tries to make a direct connection with the publishers of this topic. If the topic does not exist, or if the type is wrong, there are no error messages: the node will simply wait until messages start being published on the topic.
A subscriber callback function is not executed continuously, that is, it is not processing all the time. It will only process when new data is published.

On VS Code - Output:

ROS Services
5.1 What are Services?
Services are synchronous calls, which when called by one node executes a function in another node. They are used only when a function/task needs to be executed occassionally, say when a robot needs to perform a very discrete task such as taking a high resolution picture using a camera, etc.
Synchronous refers to an intereference with time, and means the that functions are performed one after the other. Messages, on the other hand, are asynchronous which means that they branch out into dfferent functions that execute simultaneously.
A Server provides a service by responding to a service call, and a Client requests for a service and accesses the service response.
What is the difference between Services and Messges?
ROS messages, which are transported using publishers and subscribers, are used whenever we need data to flow constantly and when we want to act on this data asynchronously. ROS services, on the other hand, are used only when we require data at specific time or when we want a task to be executed only at particular instances.
To better understand this, take a look at the following example.
- We have a robot that simulates it’s environment in real-time. In such cases, we would use publishers/subscribers to send messages as that data flow needs to be constant. Also, we would want the robot to do other tasks as well, apart from just reading real-time data. If we use services, then the server/client would have to wait for a response/request and blocks the other code in the node, preventing other tasks from being executed,
- We have a robot that detects people in front of it. We would use services here as the node will wait for a person to come in front of it, then sends a request to the server and blocks the code while waiting for a response. Using messages here is pointless as we don’t want to continuously check for people in front of the robot (it’s just a one-time task).
Reference: https://stackoverflow.com/questions/29458467/ros-service-and-message#:~:text=It%20is%20a%20similar%20example,the%20rest%20of%20its%20job.
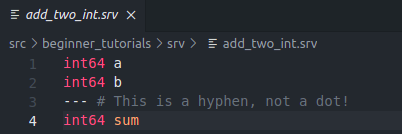
5.2 Service files
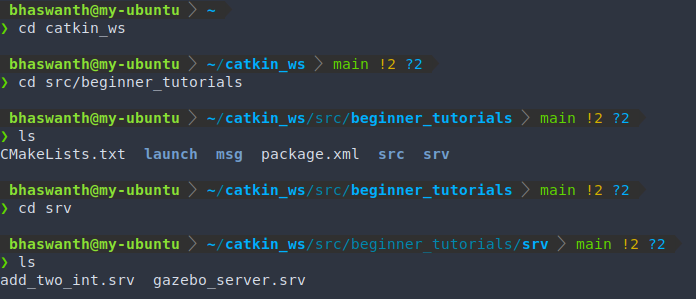
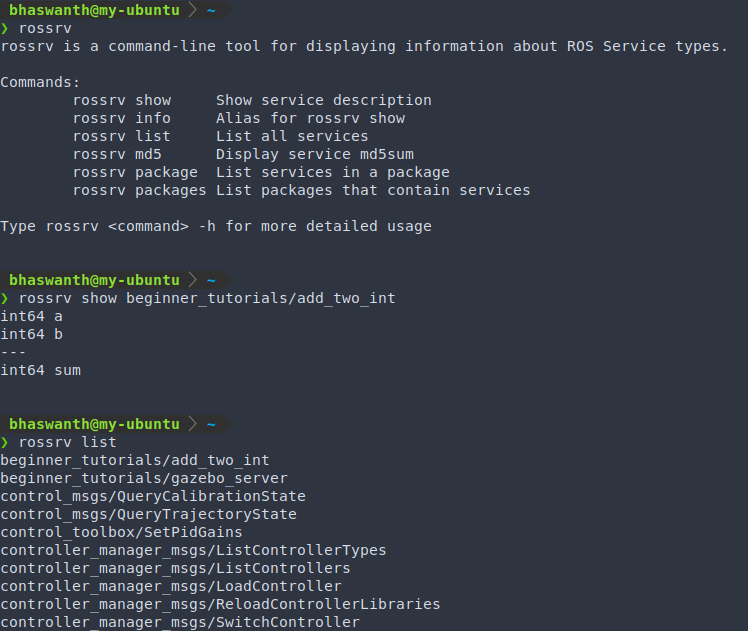
Service files have an input and output call, and have the extension .srv. These files are present in the srv directory of a package. Here’s how a typical service file is defined
int 64 a
int 64 b
---
int64 sum
In order for the service files to run, a few changes have to be made in the package.xml file and CMakeLists.txt file.
In package.xml
1
2
3
# The following lines need to be added at the end of the file
  <build_depend>message_generation</build_depend>
  <exec_depend>message_runtime</exec_depend>
In CMakeLists.txt Modify the file to make the following changes, if not done earlier
1
2
3
4
5
6
7
# Modify the existing line
find_package(catkin REQUIRED COMPONENTS
  roscpp
  rospy
  std_msgs
  message_generation
)
message_generationwas added in both the files and is done while creating messages as well. It works for both msg and srv.
1
2
3
4
5
add_service_files(
  FILES
  Service1.srv
  Service2.srv
)
After the necessary changes are made, we need to run catkin_make or catkin_make --only_pkg_with_deps <package_name> to compile the workspace or a particular package.
Running catkin_make will create 2 additional classes for the service file as well. For example, if a service file is named add_two_int.srv, then the two classes add_two_intResponse and add_two_intRequest are created along with the previously existing add_two_int class. These classes allow us to interact with the service by calling for a Response or a Request.
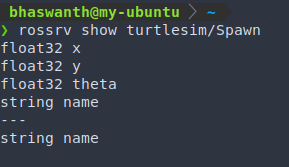
5.3 Using rossrv
Documentation - http://wiki.ros.org/ROS/Tutorials/CreatingMsgAndSrv
5.4 Using rosservice
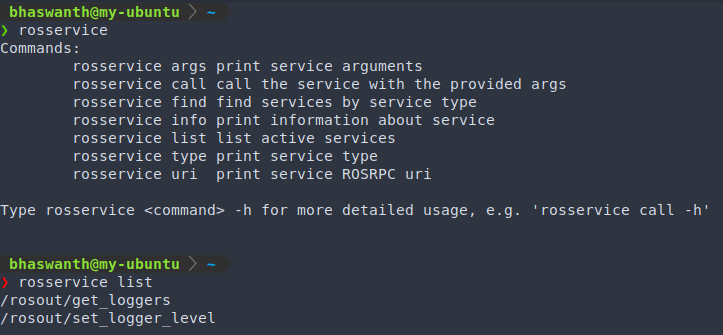
Difference between rossrv and rosservice
rossrvis a tool that provides us with information about all files ending in .srv
rosserviceis a tool that allows us to interact with Servers and Clients that are currently active.Reference - https://answers.ros.org/question/349148/rossrv-vs-rosservice/
5.5 Creating a simple Server
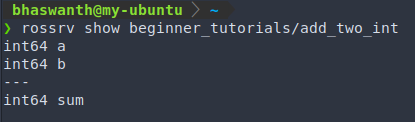
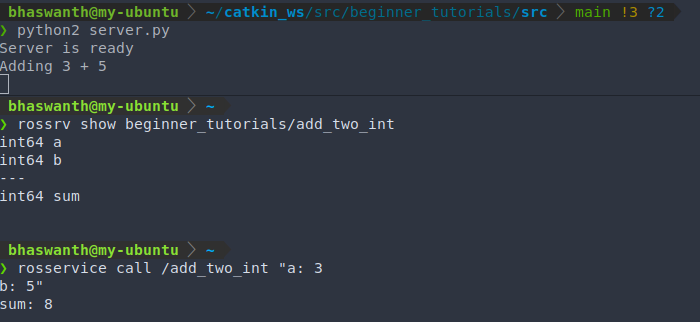
Before we get into creating a server, let us take a look at out service definition file.
The same info can be gathered using the rossrv command, as shown below.
Let us now create a server file, which would act as a python node for providing the service. Here’s the code for creating a simple server.
Code:
1
2
3
4
5
6
7
8
9
10
11
12
13
14
15
16
17
18
19
20
#! /usr/bin/python2

import rospy
from beginner_tutorials.srv import add_two_int,add_two_intResponse

response = add_two_intResponse()

def add_ints(req):
    print('Adding {} + {} '.format(req.a,req.b))
    response.sum = req.a + req.b
    return response.sum


rospy.init_node('add_two_int_server')

srv = rospy.Service('add_two_int',add_two_int,add_ints)

print('Server is ready')

rospy.spin()
5.5.1 Code Explanation
We import the add_two_intResponse class as we are writing code for a Server, which provides a response for the service that is called.
response is an object of the class add_two_intResponse().
srv = rospy.Service('add_two_int',add_two_int,add_ints) This line creates an object named srv and declares/starts a service. The new service is given the name ‘add_two_int’ and has the service type add_two_int. add_ints is a callback function that performs a desired task.
The function add_ints takes a variable as a request and returns the sum of ‘a’ and ‘b’.
Execution:
5.6 Creating a simple Client
Like all python nodes, the client service file should also be created under the src directory of a package.
Code:
1
2
3
4
5
6
7
8
9
10
11
12
13
14
15
#! /usr/bin/python2

import rospy
from beginner_tutorials.srv import add_two_int, add_two_intRequest


req = add_two_intRequest()
req.a = 4
req.b = 5

rospy.wait_for_service('add_two_int')

add_two_ints = rospy.ServiceProxy('add_two_int',add_two_int)
response = add_two_ints(req)
print(response.sum)
5.6.1 Code Explanation
The class add_two_intRequest is imported in a client node as we need to send a Request to the Server.
req = add_two_intRequest() : req is an object of the class add_two_intRequest(). The inputs for the object are given in the next two lines, which are to be sent to the server.
rospy.wait_for_service('add_two_int'): This is a method that blocks until the service named ‘add_two_int’ is available.
add_two_ints = rospy.ServiceProxy('add_two_int',add_two_int): This is how we call a service of the service name add_two_int and service type add_two_int.
What is ServiceProxy?
Before we get into that, what is a Proxy ? A proxy is a gateway between a client and a server (usually a website) that takes a request and performs a function.
In a similar way, a ServiceProxy acts as an intermediary between a Client and a Server. It takes in the request from a Client and sends it to the Sever where it is passed into a function.
response = add_two_ints(req): The request is passed into the service call line, and is sent to the server which returns the desired output.
print(response.sum): The sum is then printed on the screen.
NOTE - The server node needs to be running while a client node is being executed.
Execution:


Refer to the server code above to better understand how the service is being provided and why it returns the above outputs.
5.7 A deeper dive into Services
Let us take a look at a few other interesting things that we can do using services.
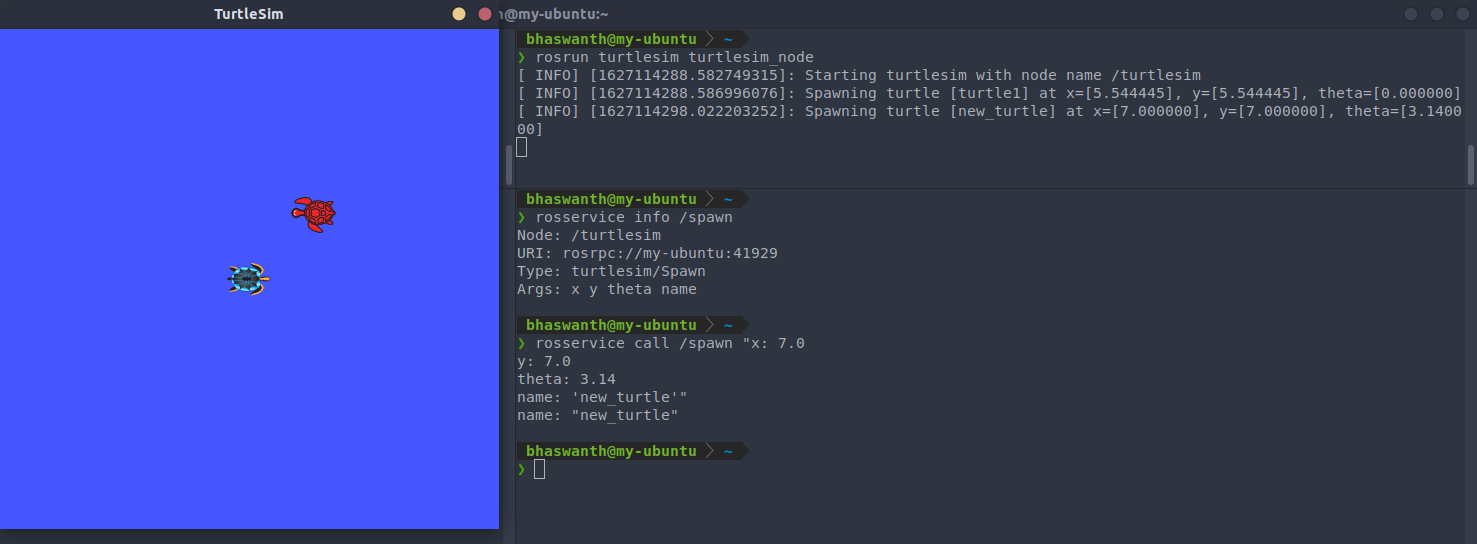
5.7.1 Spawning 2 turtles in the same node
Here’s a list of the services associated with turtlesim. 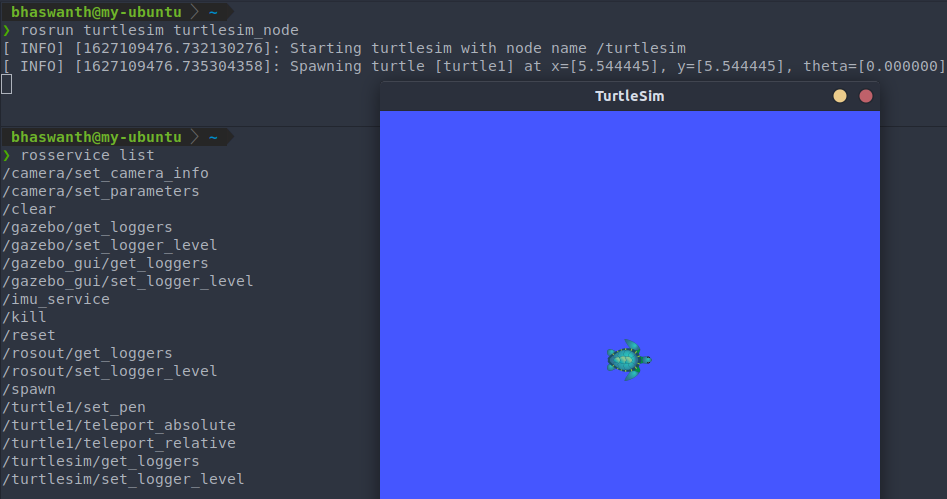
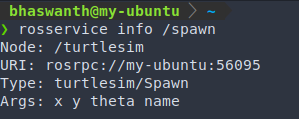
The one which we are particularly interested in, to spawn 2 turtles in the same node, is the service named ‘/spawn’. Here’s some info about the service ‘/spawn’.
In order to spawn two turtles, we call a service and pass in the necessary parameters, which is demonstrated below
5.7.2 Getting laser scan data using gazebo
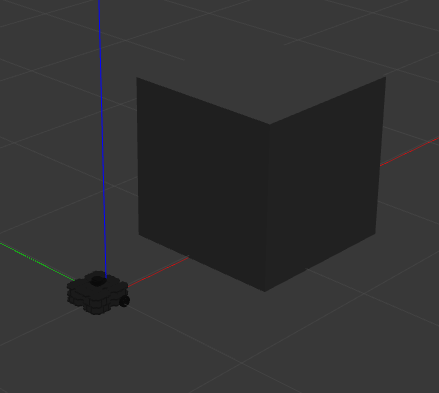
Spawn your turtlebot3 on gazebo by running the following command roslaunch turtlebot3_gazebo turtlebot3_empty_world.launch
Place a block in front of your turtlebot3, as shown below
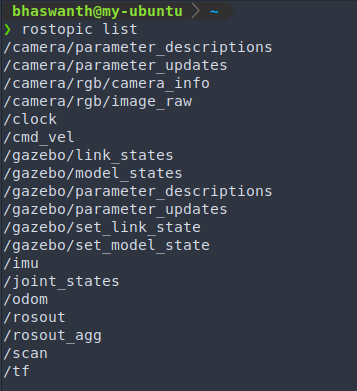
Let us take a look at the various topics associated with gazebo
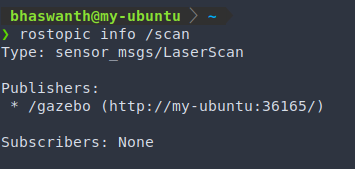
Here, we find a topic named /scan which is pretty interesting. To learn more about this topic, let us do a rostopic info, as shown below.
Let us now take a look at what this message sensors_msgs/LaserScan has to offer.
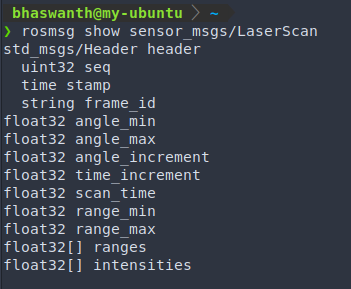
Thus, this message provides us with several things related to the sensors output, and more importantly, gives us an array of all ranges of the laser scan. This is something that can be incredibly useful. However, subscribing to this would provide us with a list of 360 values (for 360 degrees), which is kinda unnecessary. Using services, we can have a synchronous callback function that provides us with data only for discrete inputs, such as giving us the range for a particular angle.
Let us now call for a service, by creating a server and a client. Before we do this, we would obviously need a service definition file present in the srv directory.
Create a file named gazebo_server.srv under the srv directory, and have the following lines.
int64 direction
---
float32 distance
int64 direction would serve as an input while float32 distance serves as the output.
We need to make the necessary changes to package.xml file and CMakeList.txt file. This has been discussed above.
Creating a Server
Code
1
2
3
4
5
6
7
8
9
10
11
12
13
14
15
16
17
18
19
20
21
22
23
24
25
26
#! /usr/bin/python2

import rospy
from sensor_msgs.msg import LaserScan
from beginner_tutorials.srv import gazebo_server, gazebo_serverResponse

rospy.init_node('My_Node', anonymous=True)

ls_obj = LaserScan()
response = gazebo_serverResponse()

def callback(val):
    global ls_obj
    ls_obj = val


def func_serv(request):
    global ls_obj
    response.distance = ls_obj.ranges[request.direction]
    return response.distance


sub = rospy.Subscriber('/scan', LaserScan, callback)

serv = rospy.Service('my_service', gazebo_server, func_serv)
rospy.spin()
Explanation
ls_obj = LaserScan(), response = gazebo_serverResponse() : Objects are created for the respective classes
sub = rospy.Subscriber('/scan', LaserScan, callback) : Subscribing to the topic /scan of the message type LaserScan, and the data from this is passed into the function named callback which stores the data in the object ls_obj.
serv = rospy.Service('my_service', gazebo_server, func_serv) : A service is started with the name my_service, service type gazebo_server, and a callback function named func_serv which returns the desired output based on the request.
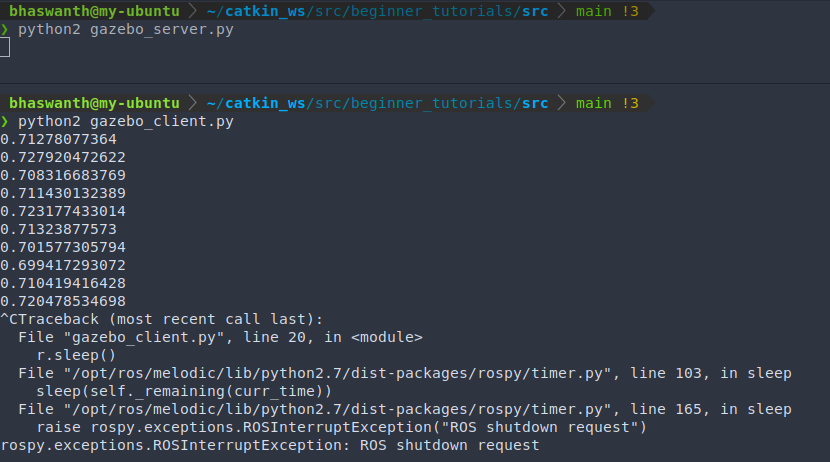
Execution

Creating a Client
Code
1
2
3
4
5
6
7
8
9
10
11
12
13
14
15
16
17
18
19
20
#! /usr/bin/python2

import rospy
from sensor_msgs.msg import LaserScan
from beginner_tutorials.srv import gazebo_server, gazebo_serverRequest

rospy.init_node('client_node')
rospy.wait_for_service('my_service')

req = gazebo_serverRequest()
req.direction = 1

srv = rospy.ServiceProxy('my_service', gazebo_server)

r = rospy.Rate(5)

while not rospy.is_shutdown():
    result = srv(req)
    print(result.distance)
    r.sleep()
Explanation
rospy.wait_for_service('my_service') : Waits for the service to start, which in our case is initialized by the server.
req = gazebo_serverRequest() : An object is created and the desired request is passed
srv = rospy.ServiceProxy('my_service', gazebo_server) : Calling for a service of the service name my_service and type gazebo_server
result = srv(req) : The request is passed into the proxy, which is sent to the server and executes the desired function.
print(result.distance) : The distance is printed on the screen.
NOTE - The server node needs to be running while a client node is being executed.
Execution
ROS Actions
6.1 Introduction
Actions are asynchronous calls in ROS, which means that you do not have to wait for a particular task to be finished and you can also do other tasks simultaneously. Reference: http://wiki.ros.org/actionlib
What is the difference between Actions and Services?
Actions are asynchronous calls which would perform almost the same functions as Services (kinda), but additionally allows you to work on other tasks in the node (i.e. no blocking code). It also allows you to get feedback, status and even cancel a call.
You can better understand this with an analogy, as explained in this link.
In some cases, if a service takes a long time to execute, the user might want the ability to cancel the request during execution or get periodic feedback about how the request is progressing. The actionlib package provides tools to create servers that execute long-running goals that can be preempted. It also provides a client interface in order to send requests to the server. A more detaied description: http://wiki.ros.org/actionlib/DetailedDescription
The ActionClient and ActionServer communicate via a “ROS Action Protocol”, which is built on top of ROS messages. The client and server then provide a simple API for users to request goals (on the client side) or to execute goals (on the server side) via function calls and callbacks. 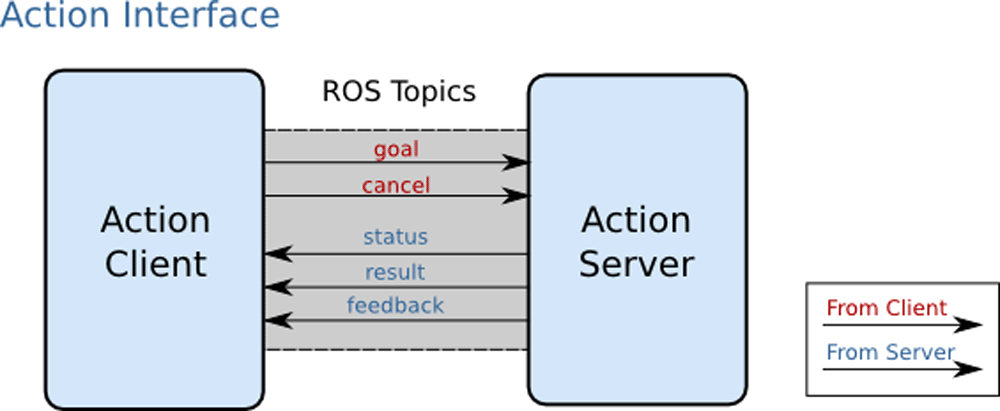 There are 5 Topics provided by an Action Server:
- goal: User (or Client) sends a goal to the Server to initiate the action.
- cancel: User sends a signal under cancel topic to interrupt or stop an action from being executed.
- status: Tells the current status of the server. There are 10 status states - PENDING, ACTIVE, PREEMPTED, SUCCEEDED, ABORTED, REJECTED, PREEMPTING, RECALLING, RECALLED and LOST.
- result: Provides the final output after executing the action.
- feedback: Provides us with intermediate results about the action while it is being executed.
NOTE - We cannot execute two actions at the same time. Doing so will cancel the previous action from being executed. If a new goal is sent to an action server that is already busy processing a goal, then the currently active goal will be pre-empted. However, this is not a hard limitation as we can have an action server that can process multiple goals.
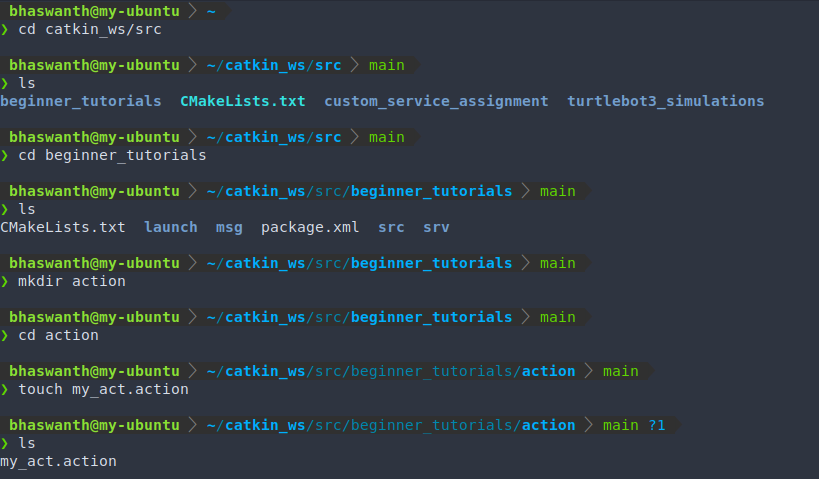
6.2 Action files
The Action definition files have an extension of .action and is used to specify the format of goal, result, feedback message. These files are present in the action directory of a package. Here’s how a typical action file is defined
int32 goal
---
int32 result
---
int32 feedback
 In order for the service files to run, a few changes have to be made in the package.xml file and CMakeLists.txt file. In package.xml Modify the file to make the following changes, if not done earlier
1
2
3
4
5
6
7
8
9
10
11
12
13
14
15
16
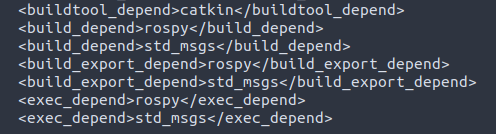
<buildtool_depend>catkin</buildtool_depend>
<build_depend>rospy</build_depend>
<build_depend>std_msgs</build_depend>
<build_depend>actionlib_msgs</build_depend>
<build_depend>actionlib</build_depend>
<build_export_depend>rospy</build_export_depend>
<build_export_depend>std_msgs</build_export_depend>
<build_export_depend>actionlib_msgs</build_export_depend>
<build_export_depend>actionlib</build_export_depend>
<exec_depend>rospy</exec_depend>
<exec_depend>std_msgs</exec_depend>
<exec_depend>actionlib_msgs</exec_depend>
<exec_depend>actionlib</exec_depend>
<build_depend>message_generation</build_depend>
<build_export_depend>message_runtime</build_export_depend>
<exec_depend>message_runtime</exec_depend>
In CMakeLists.txt Modify the file to make the following changes, if not done earlier
1
2
3
4
5
6
7
8
# Modify the existing line
find_package(catkin REQUIRED COMPONENTS
  roscpp
  rospy
  std_msgs
  message_generation
  actionlib_msgs
)
1
2
3
4
5
# Generate actions in the 'action' folder
add_action_files(
  FILES
  my_action.action
)
1
2
3
4
5
6
## Generate added messages and services with any dependencies listed here
generate_messages(
  DEPENDENCIES
  std_msgs
  actionlib_msgs
)
1
2
3
4
5
# Add actionlib_msgs as a catkin dependency
catkin_package(
  CATKIN_DEPENDS rospy std_msgs message_runtime
  actionlib_msgs
)
After the necessary changes are made, we need to run catkin_make or catkin_make --only_pkg_with_deps <package_name> to compile the workspace or a particular package. After compiling a package, ROS wil create additional messages for you. For example, if your action definition file is named robot.action, then the following messages will be created:
- robotAction.msg
- robotActionGoal.msg
- robotActionResult.msg
- robotActionFeedback.msg
- robotGoal.msg
- robotResult.msg
- robotFeedback.msg These messages are used by actionlib to facilitate communication between ActionServer and ActionClient. The topics used in actions (mentioned above) will use one of these messages, whichever suits its function.
In general, if you’re using the libraries in the actionlib package, you should not need to access the autogenerated messages with Action in their type name. The bare Goal, Result, and Feedback messages should suffice. The others are used internally by ROS, i.e., by the actionlib package.
Let’s take a closer look at the counterAction message type.
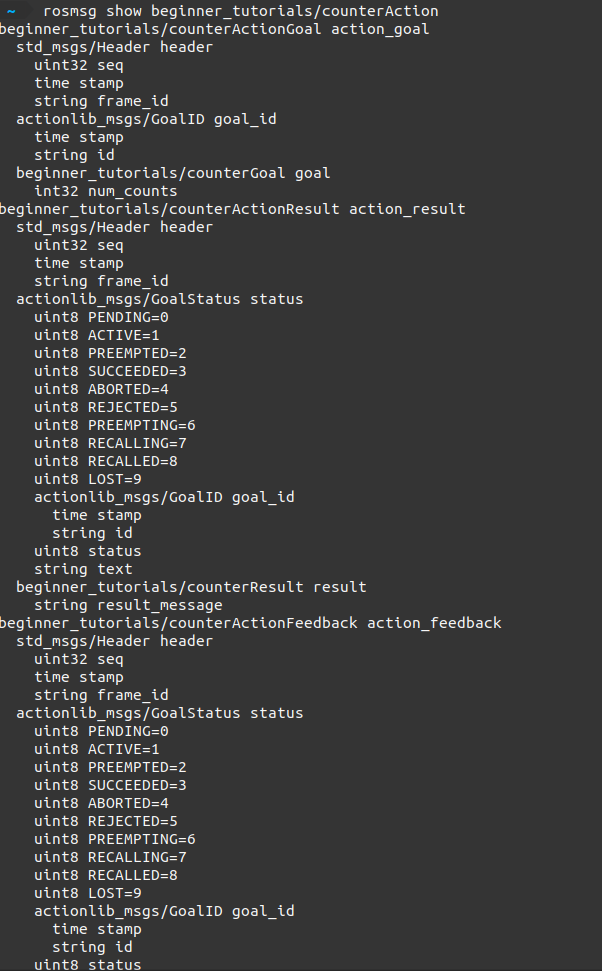
Once the goal is registered by the action server, the request is first given a time stamp and header information by actionlib indicating when and which action client requested this goal. Then the actionlib package also assigns a unique goal identifier to this goal along with a time stamp. Finally we have the goal message that we sent from our action client. Now the same goes with the action result. Inside the actionlib package, there is a state machine that is started to process the goal request that we sent. This state machine can lead to the requested goal being in different states and provides us with the status message. The same goes with the action feedback again, but now with a different state machine, and it also has the content of the feedback message.
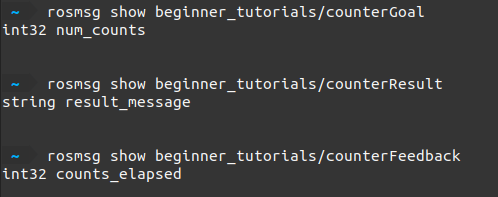
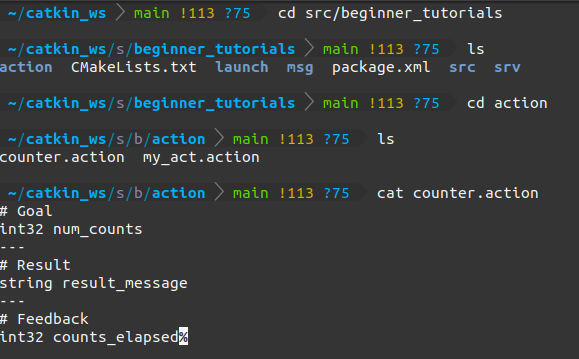
Let us create a custom action file and call it counter.action.
1
2
3
4
5
6
7
8
# Goal
int32 num_counts
---
# Result
string result_message
---
# Feedback
int32 counts_elapsed
Creating a simple Server
Code:
1
2
3
4
5
6
7
8
9
10
11
12
13
14
15
16
17
18
19
20
21
22
23
24
25
26
27
28
29
30
31
32
33
34
35
36
37
38
39
40
41
42
43
44
45
46
47
48
49
50
51
52
53
54
55
56
57
58
59
60
61
62
63
#! /usr/bin/python3

import rospy
# import actionlib library used for calling actions
import actionlib
# import custom action file. Since actions are based on messages, notice how we import actions from the msg directory of a package.
from beginner_tutorials.msg import counterAction, counterResult, counterFeedback

class Server():

    def __init__(self):
        # create a simple ActionServer by passing the name, action type, and callback function as its parameters.
        # auto_start has to be declared explicitly and always has to be set to False to prevent autostarting the server (can break your code otherwise).
        self.server = actionlib.SimpleActionServer('my_action_server', counterAction, self.counter, auto_start=False)

        # start server
        self.server.start()
        rospy.loginfo("Action server started")


    def counter(self,goal):
        self.res = counterResult()
        self.feedback = counterFeedback()

        # initializing the feedback variable to 0
        self.feedback.counts_elapsed = 0

        # for 1s delay
        r = rospy.Rate(1)

        self.res.result_message = "Counting complete!"

        # start counting till the goal
        for i in range(0, goal.num_counts):

            success = True

            # check that preempt has not been requested by the user
            if self.server.is_preempt_requested():
                rospy.loginfo("my_action_server: Preempted")
                self.server.set_preempted()
                success = False
                break

                # publish the feedback
            self.feedback.counts_elapsed = i
            self.server.publish_feedback(self.feedback)

            # wait for 1s before incrementing the counter
            r.sleep()

        if success == True:
            # Once the necessary function is executed, the server notifies the client that the goal is complete by calling set_succeeded.

            self.server.set_succeeded(self.res)


rospy.init_node("counter_action_server")
# initialize object called server to call the Server() class.
server = Server()

rospy.spin()
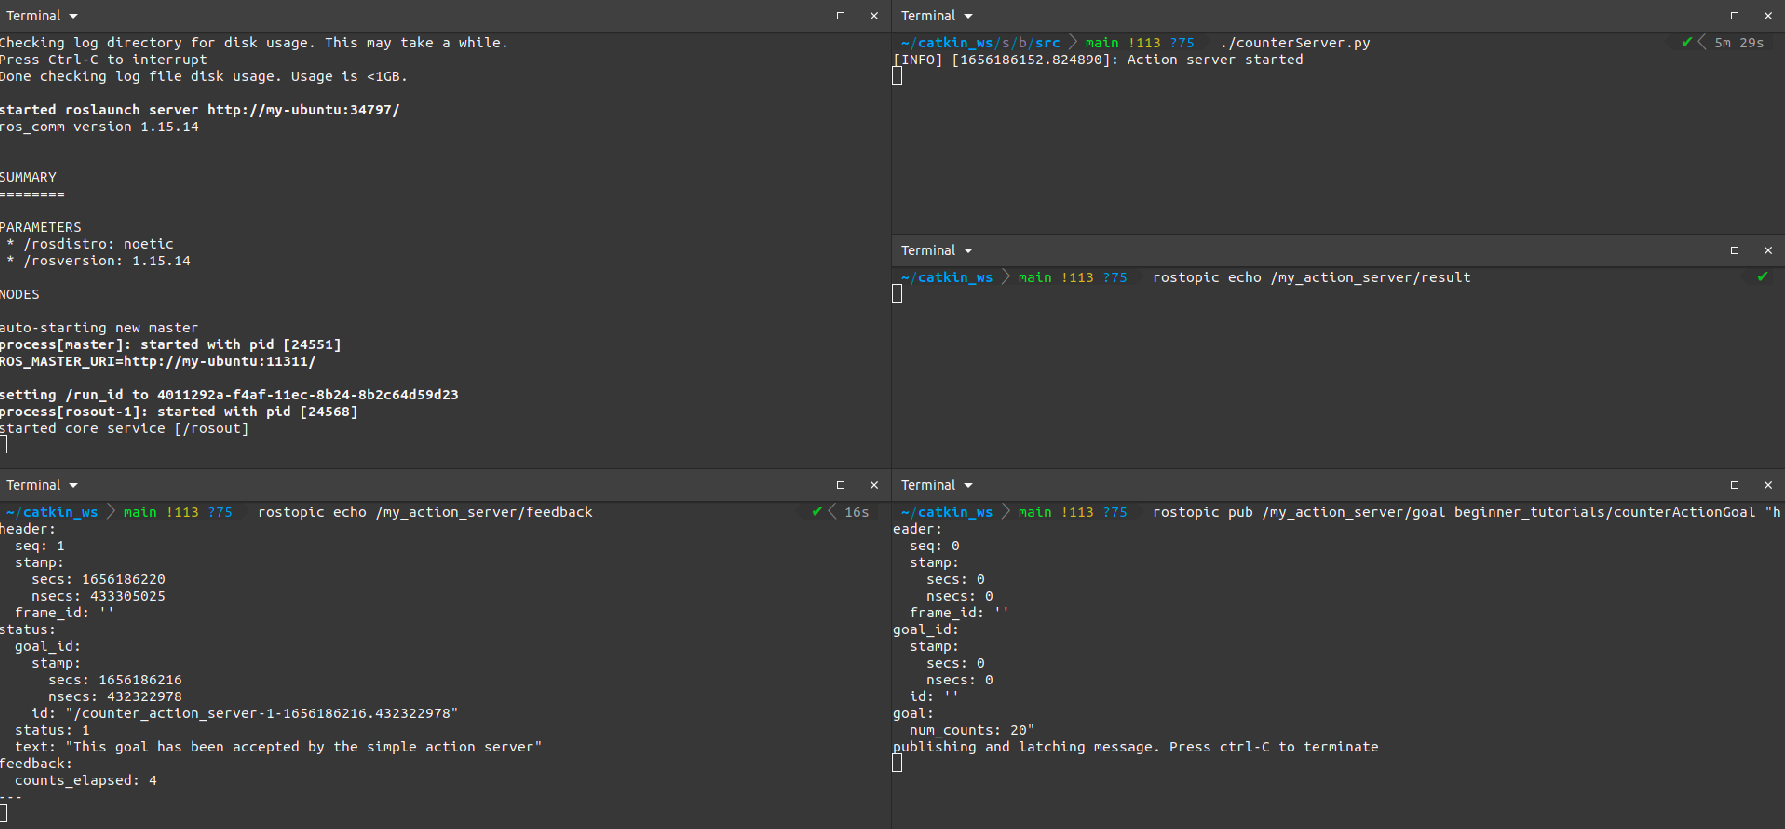
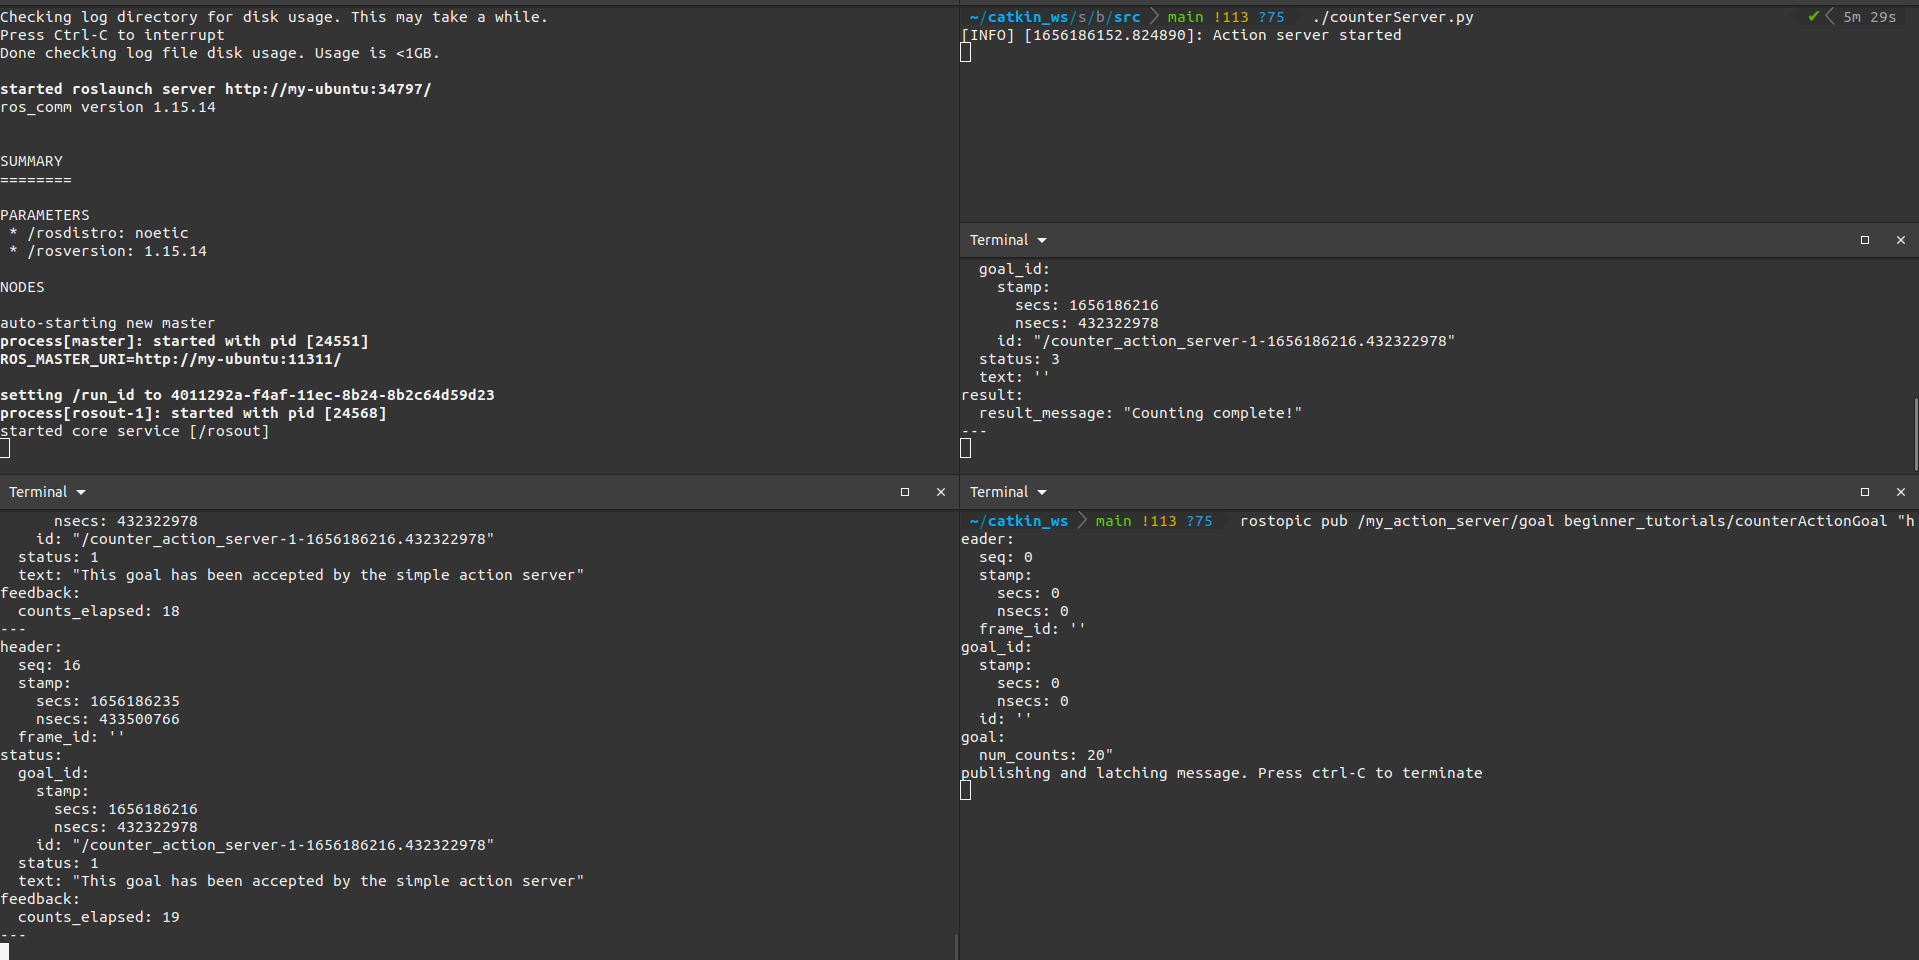
Execution:
rosrun <package_name> <file_name>
Send goals via terminal:
rostopic pub /action_server_name/goal /package_name/action_message_type parameters
Creating a simple Client
Code:
1
2
3
4
5
6
7
8
9
10
11
12
13
14
15
16
17
18
19
20
21
22
23
24
25
26
27
28
29
30
31
32
33
34
35
36
37
38
39
40
41
42
43
#! /usr/bin/python3
import rospy
# import actionlib library
import actionlib
# import custom action file
from beginner_tutorials.msg import counterAction, counterGoal
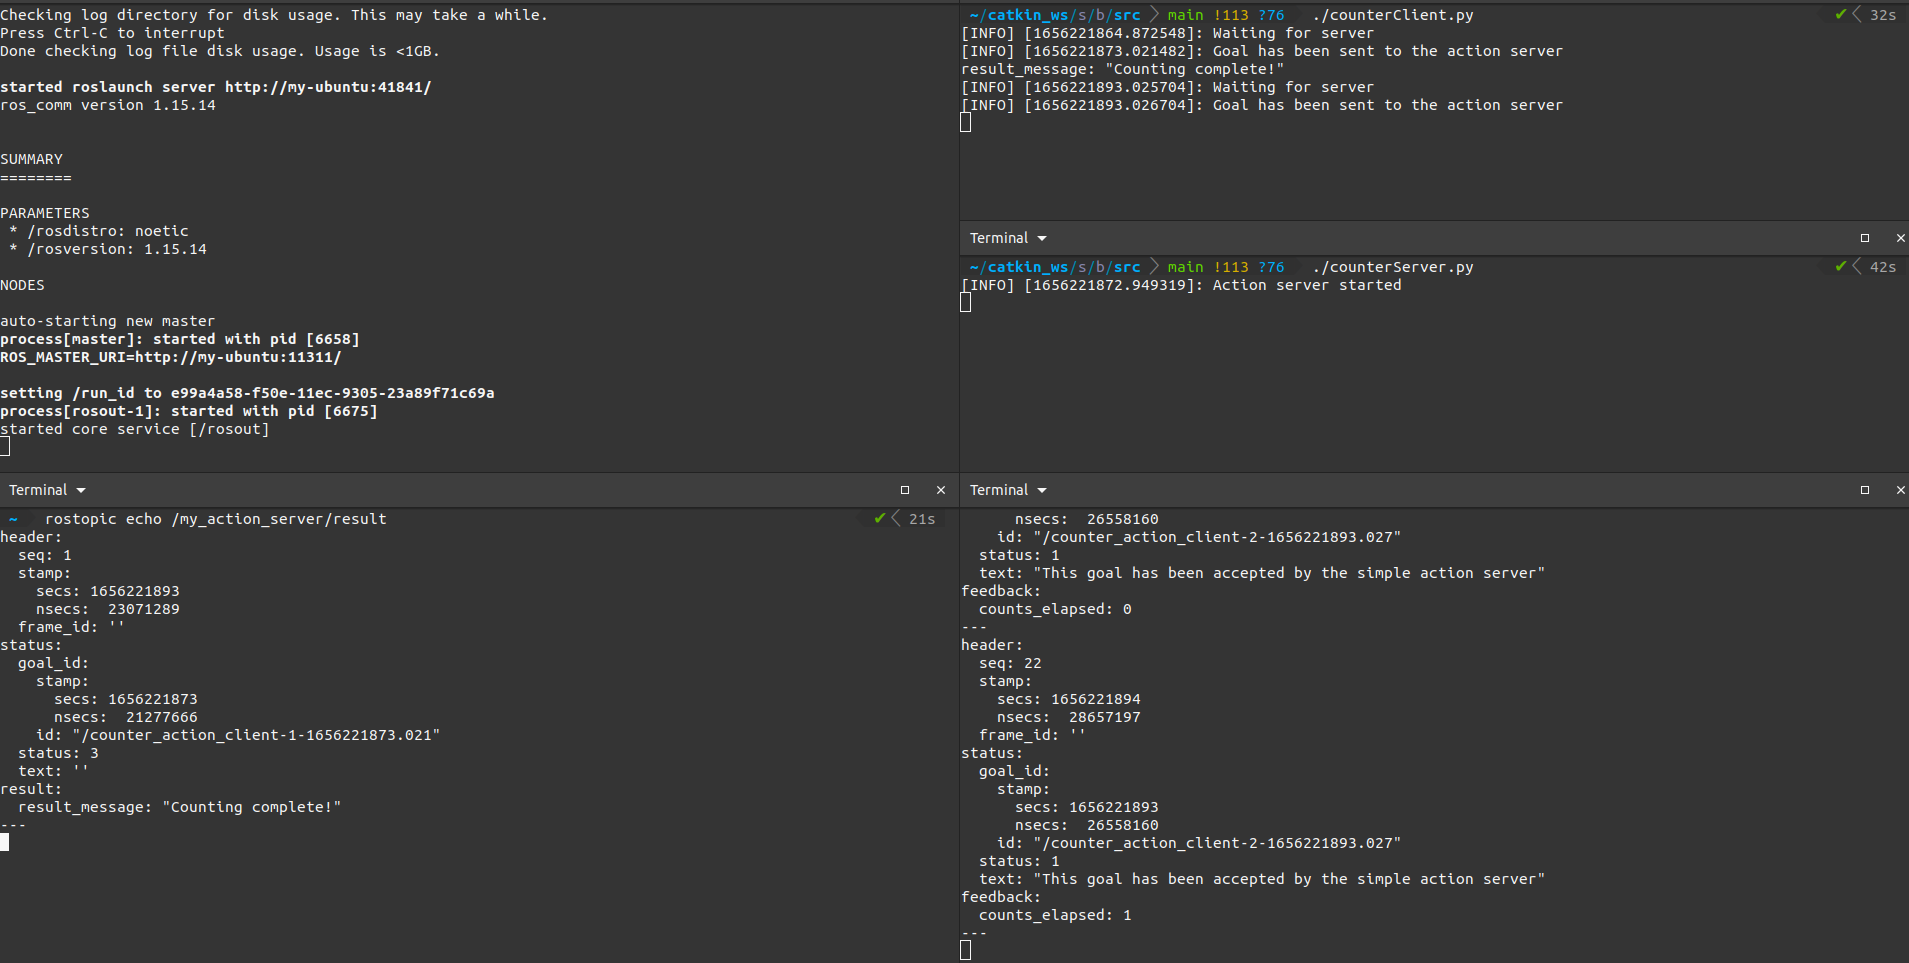
def Client():
# create client and specify the name of server and action message type
client = actionlib.SimpleActionClient('my_action_server', counterAction)
rospy.loginfo("Waiting for server")
# wait for server (name specified above)
client.wait_for_server()
goal = counterGoal()
goal.num_counts = 20
# send goal to server
client.send_goal(goal) # client.send_goal(goal, feedback_cb=feedback_func)
rospy.loginfo("Goal has been sent to the action server")
# can perform other tasks here as well
# wait for result
client.wait_for_result()
return client.get_result()
while not rospy.is_shutdown():
# initialize node
rospy.init_node("counter_action_client")
r = rospy.Rate(1)
# call the function and print result
res = Client()
print(res)
r.sleep()
Explanation
client.wait_for_result(): This will wait until the action is complete and blocks the remaining code. This won’t allow you to continue to work on your thread.
client.get_state(): It returns an integer that specifies the state of the action. There are 10 possible states, a few of which are
- 0 implies PENDING
- 1 implies ACTIVE
- 2 implies PREEMPTED
- 3 implies SUCCEEDED
- 4 implies ABORTED
If your get_state() is less than 2, it indicates that your action is still not complete.
client.cancel_goal(): Used to cancel or preempt a goal.
Execution
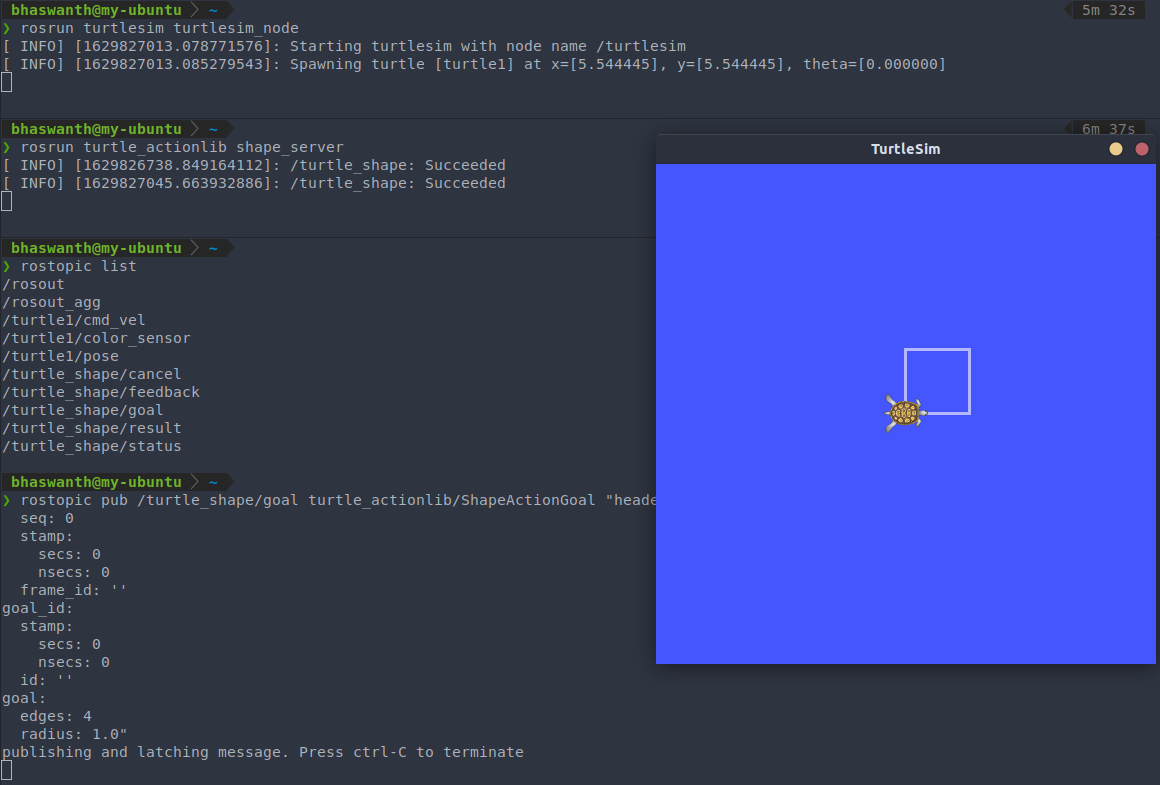
Turtlesim example
As you can see below, running the following commands instructs turtlesim to move along a pentagon.
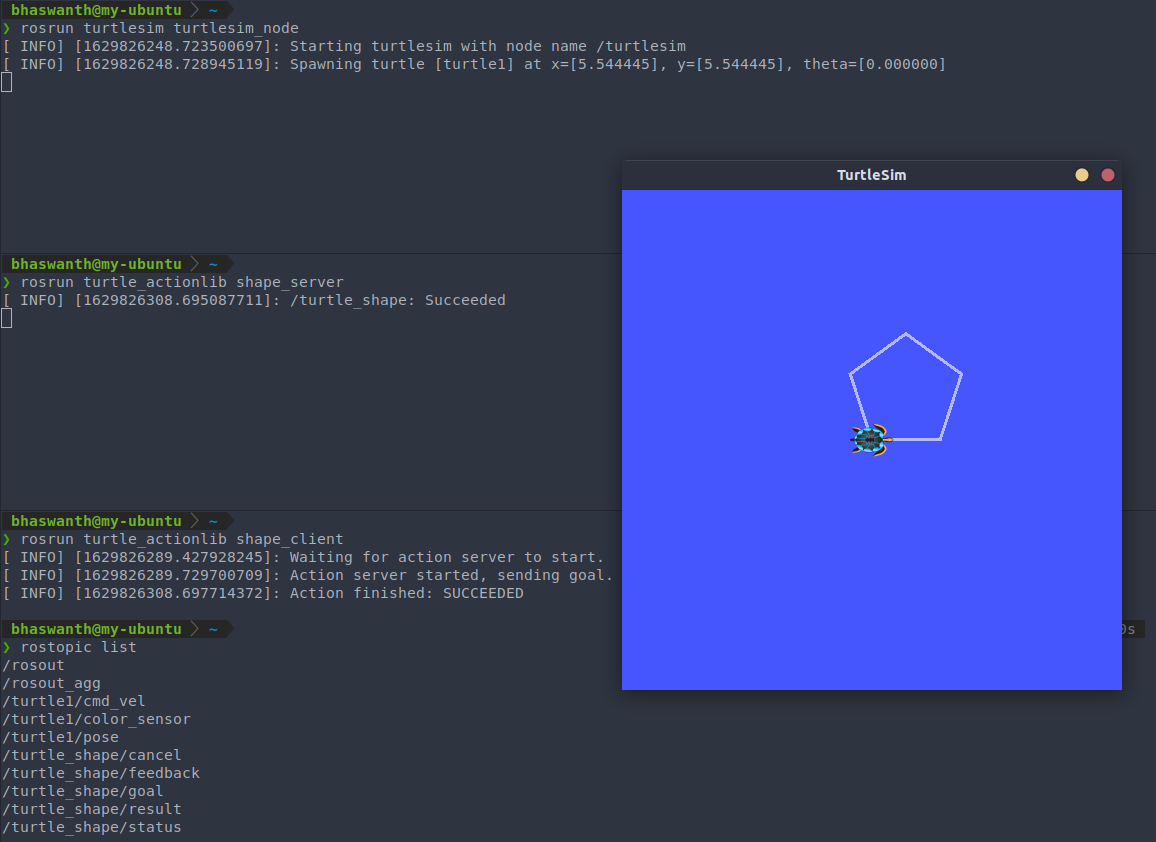
On running rostopic list we see a list of all the current topics. /turtle_shape/goal is one such topic, which allows you to publish messages to the server through the terminal. It allows us to enter the number of edges and define the radius as well.
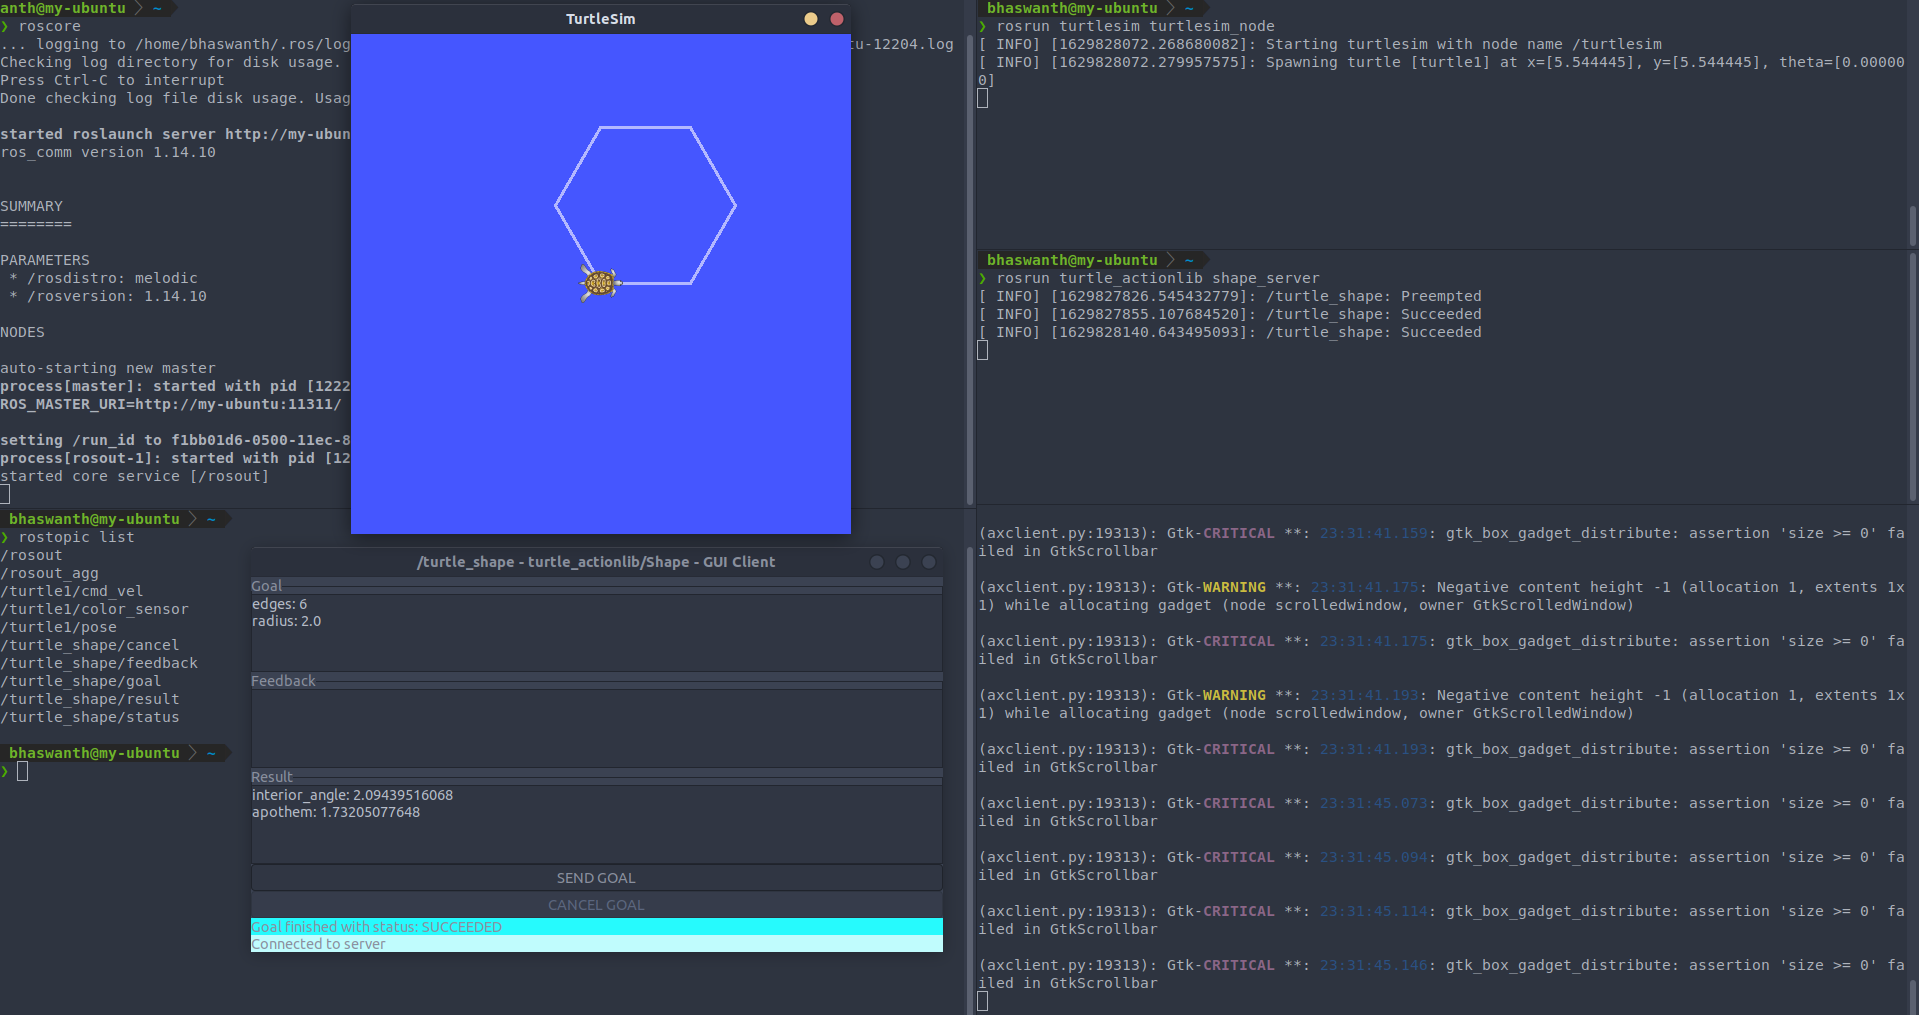
GUI
The actionlib offers a graphical way to send goal to action server. Syntax- rosrun actionlib axclient.py /name_of_the_action
The GUI has areas for Goal, Feedback and Result. You can press the SEND GOAL button to send goals with the relevant parameters, and you can also cancel or preempt a goal anytime with the CANCEL GOAL button. After the action finished successfully, the GUI shows the Result.
ROS TF2
7.1 Introduction to TF2
TF2 is the second generation of the transform library, which lets the user keep track of multiple coordinate frames over time. TF2 maintains the relationship between coordinate frames over time, and lets the user transform points, vectors, etc. between any two coordinate frames at any desired point in time.
TF2 is not a centralized service, but is a distributed protocol with which many different robots will communicate about the state of the robot.
In TF2, Publishers are known as Broadcasters, and Subscribers are known as Listeners.
- Listeners listen to /tf and cache all data heard up to the cache limit.
- Broadcasters publish transforms between coordinate frames on /tf.
7.1.1 Applications of transformations between frames:
The following are some of the applications where the tf2 library can be used:
- Compute inverse and forward kinematics of multi-joint robots
- Carry out obstacle avoidance
- Convey location of robot or parts of a robot
- Convert sensor data from one reference to another
- Control robot about a particular point in space
- Analyze multiple robot data in world frame
- Reference external objects w.r.t robot frame
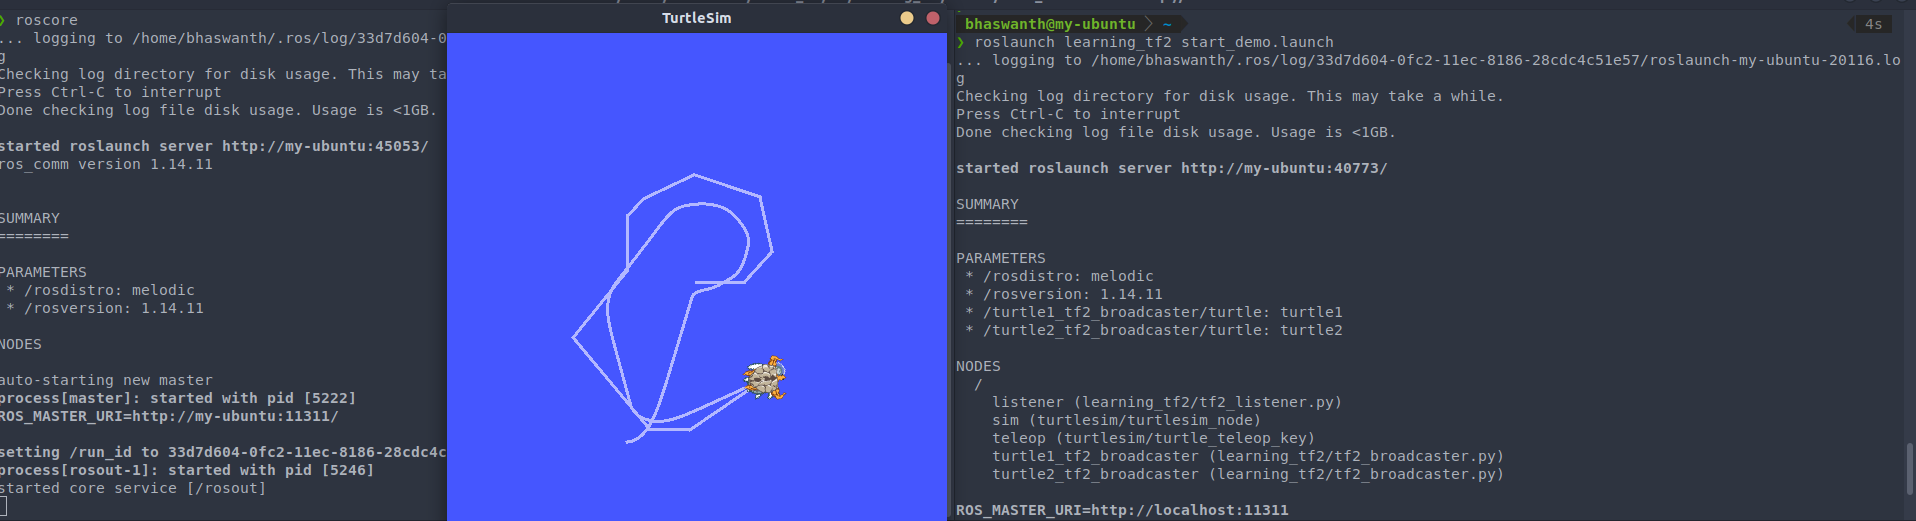
7.2 Demo using turtlesim
Enter the following command to install the necessary dependencies and compile the demo package. sudo apt-get install ros-$ROS_DISTRO-turtle-tf2 ros-$ROS_DISTRO-tf2-tools ros-$ROS_DISTRO-tf
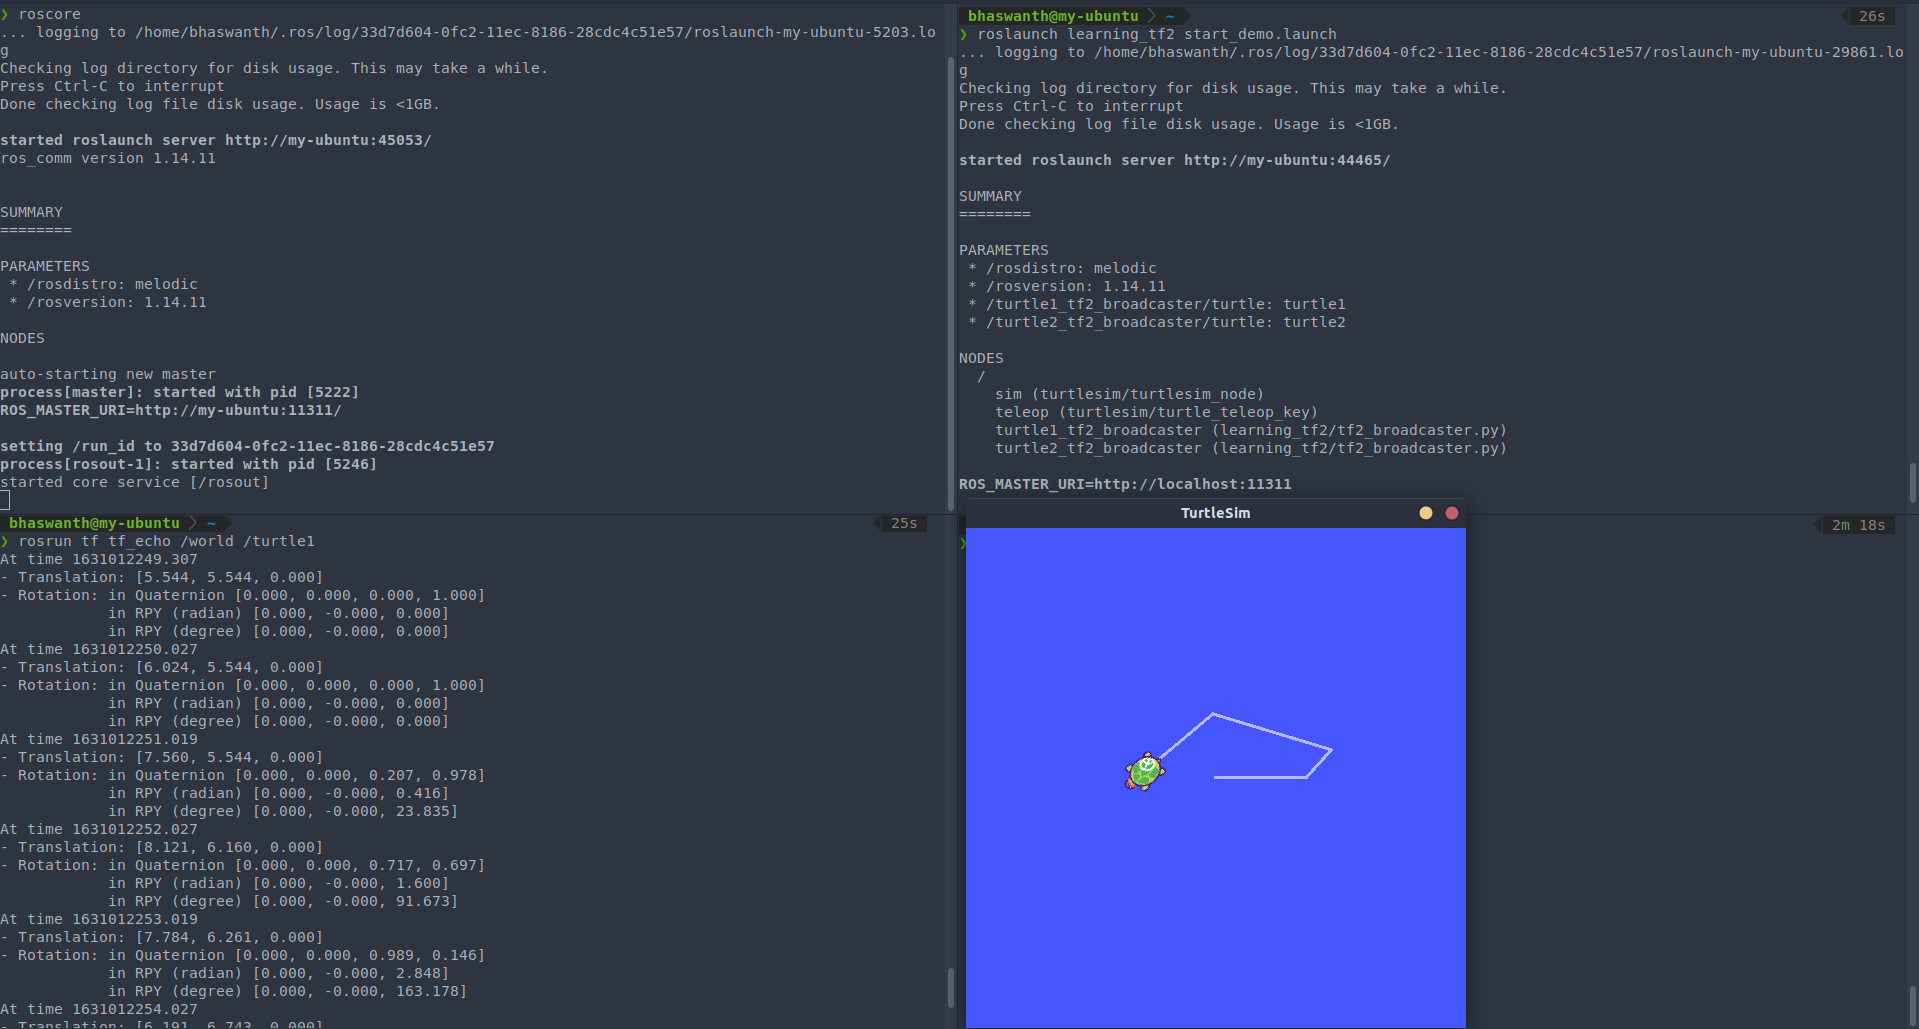
After compiling the turtle_tf2 tutorial package, enter the following the run the demo: roslaunch turtle_tf2 turtle_tf2_demo.launch
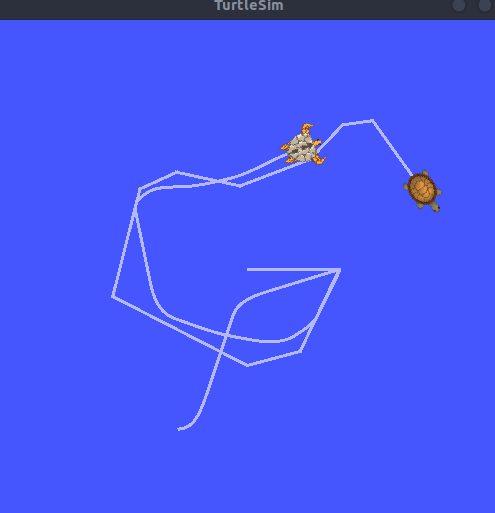
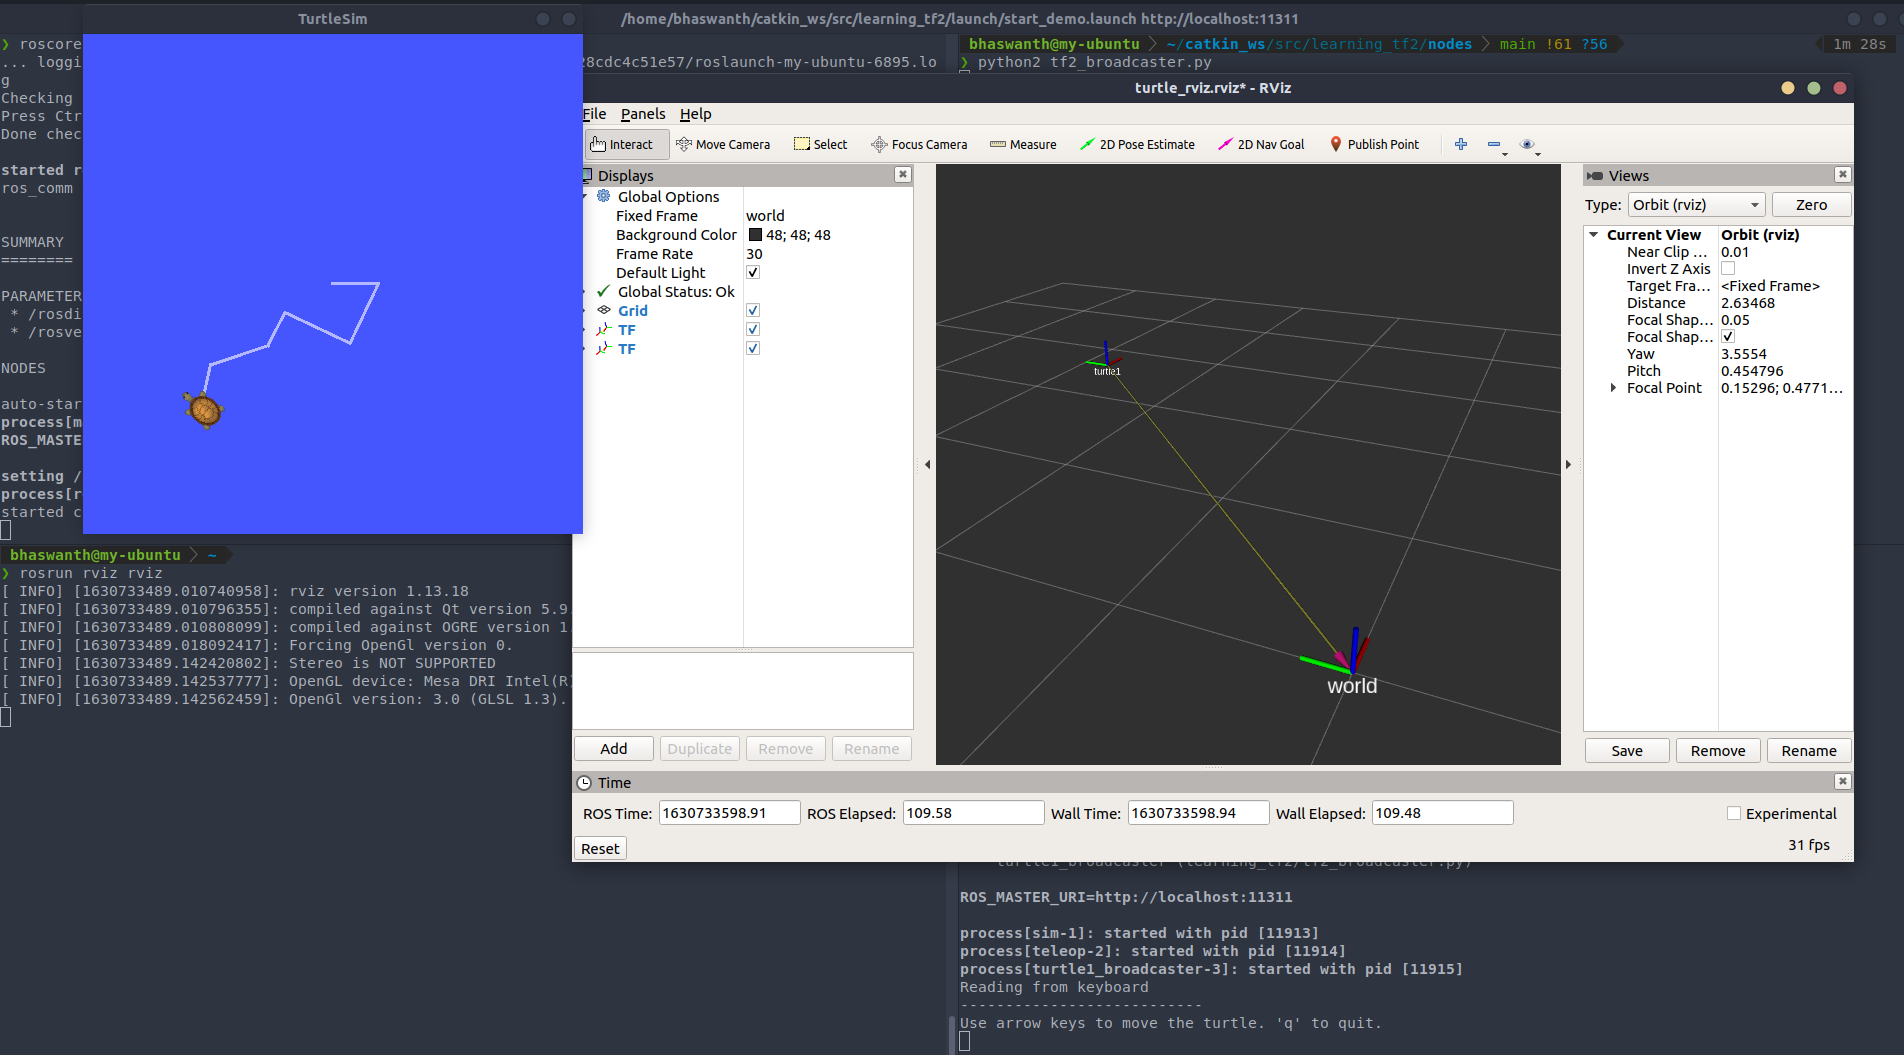
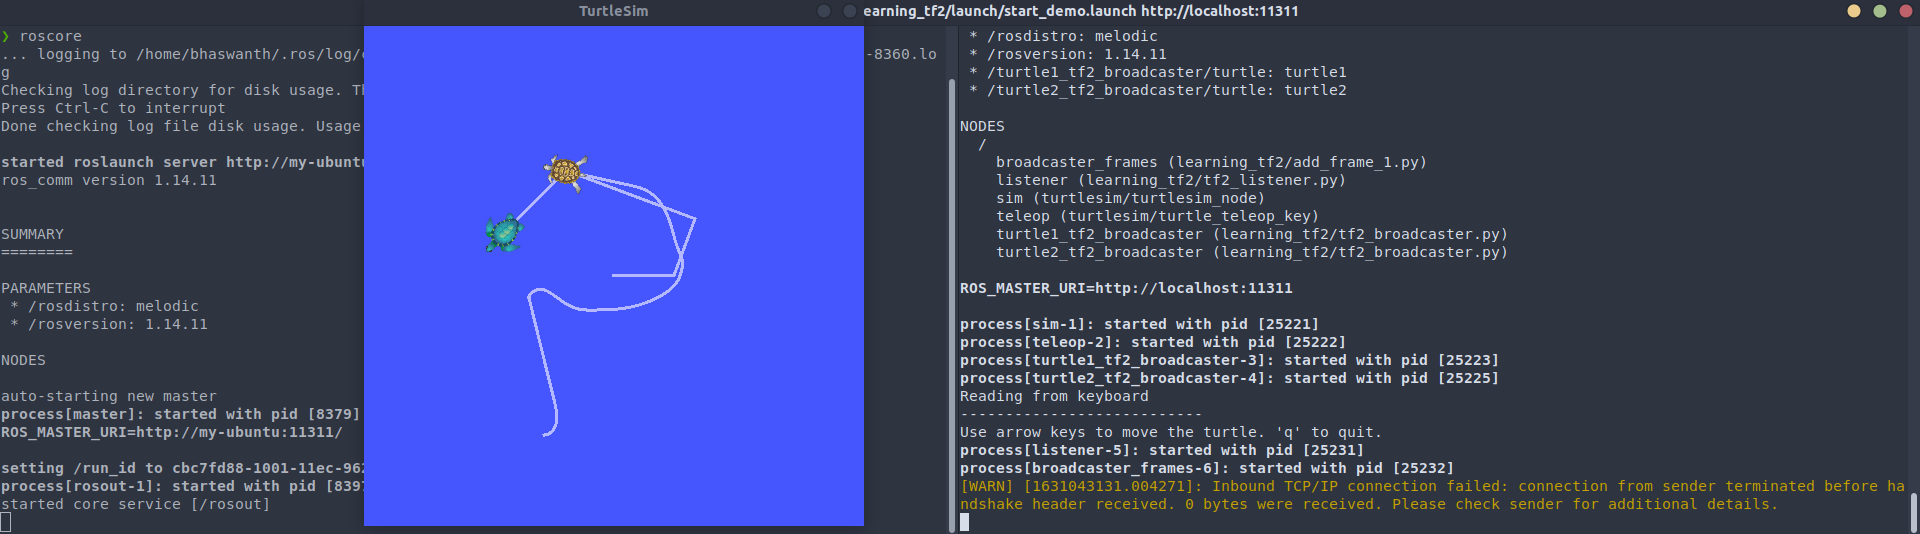
Once the turtlesim is started you can drive the center turtle around in the turtlesim using the keyboard arrow keys. On moving the center turtle, you will see that the other turtle also moves continuously to follow the turtle that you are driving around.
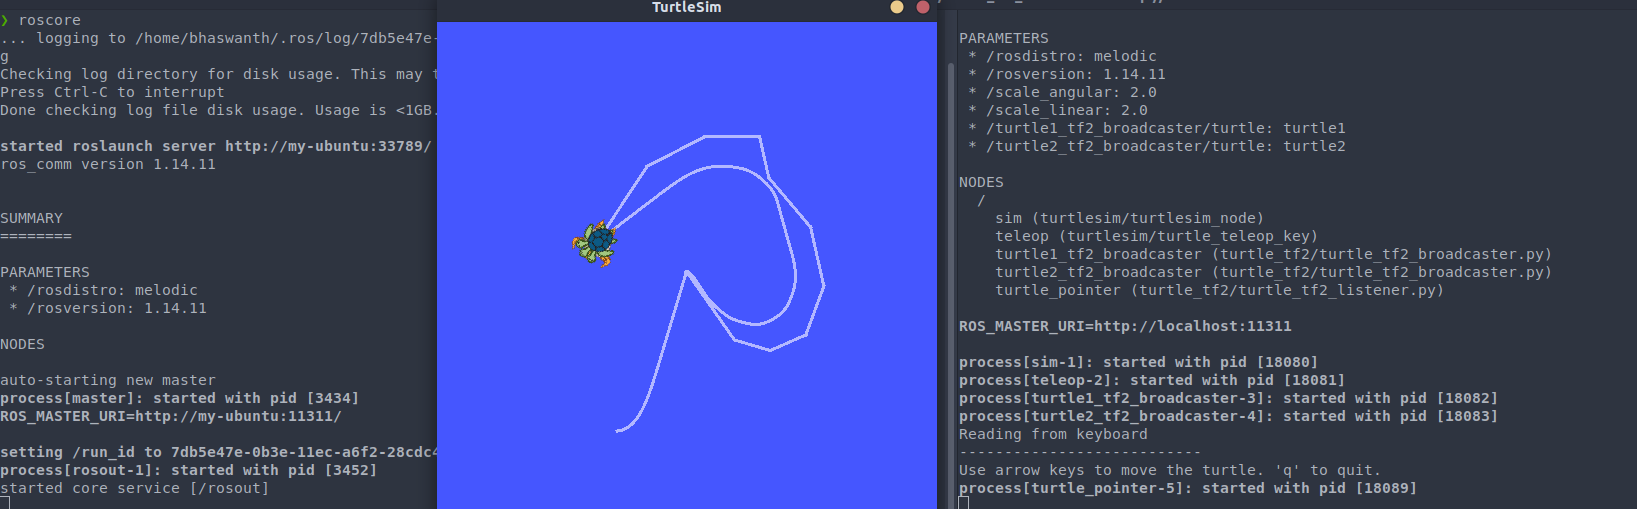
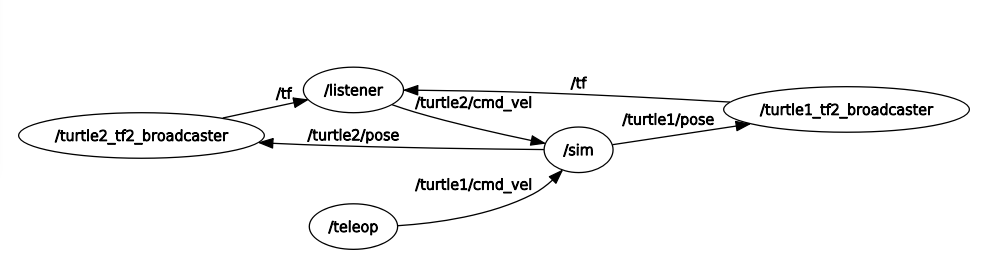
On entering the above command, you are essentially executing two main things:
- A TF2 broadcaster that is publishing the coordinate frames of both the turtles w.r.t the world frame.
- A TF2 listener that reads the transformations and uses it to calculate the direction in which turtle2 has to move to follow turtle1.
7.2.1 TF2 tools
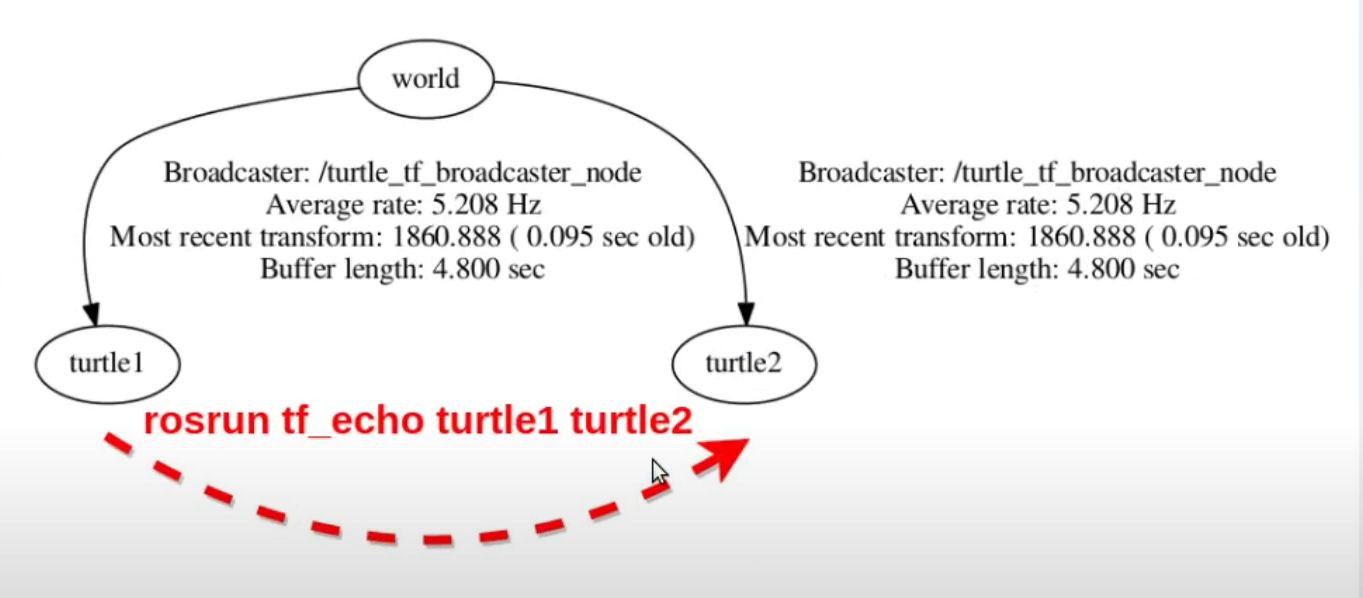
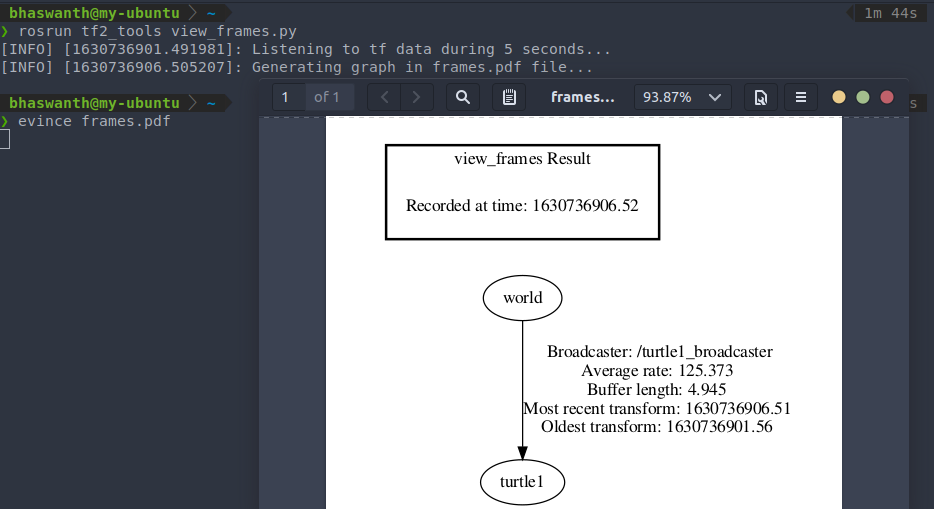
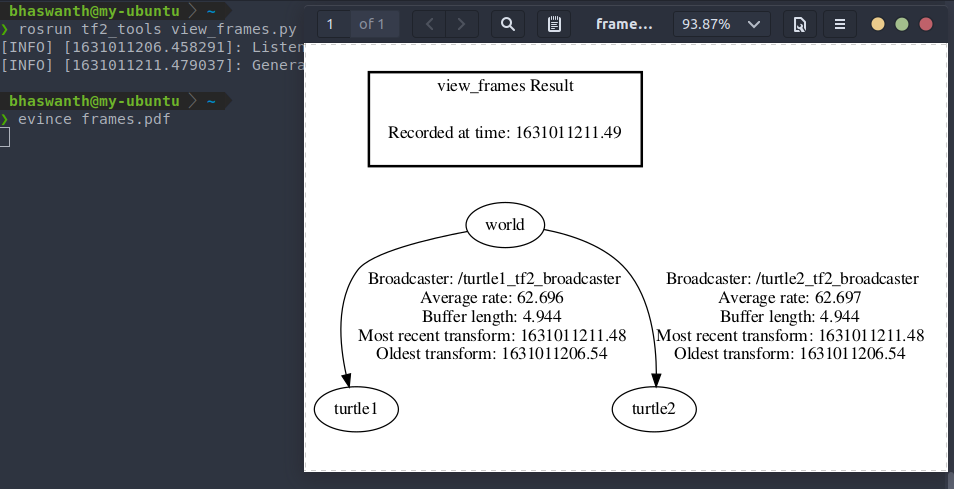
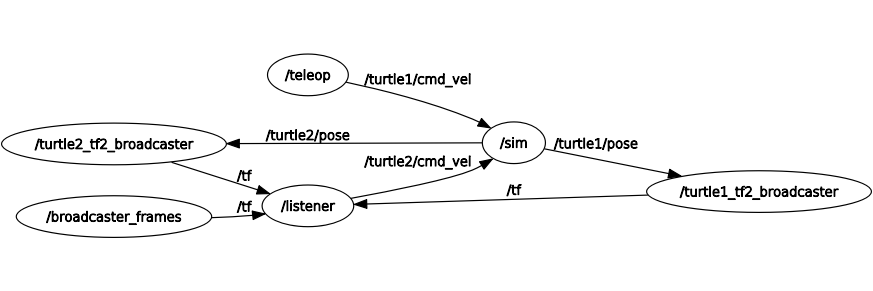
view_frames:
view_frames is one of the TF2 tools that generates a diagram of the frames being broadcast by TF2 over ROS with the current TF2 tree. This diagram is stored as a pdf.
Syntax to run view_frames: rosrun tf2_tools view_frames.py
This is what you will see:
Listening to tf data during 5 seconds...
Generating graph in frames.pdf file...
To view the tree diagram, we just need to open the pdf. If evince is your default document viewer, then run the command evince frames.pdf
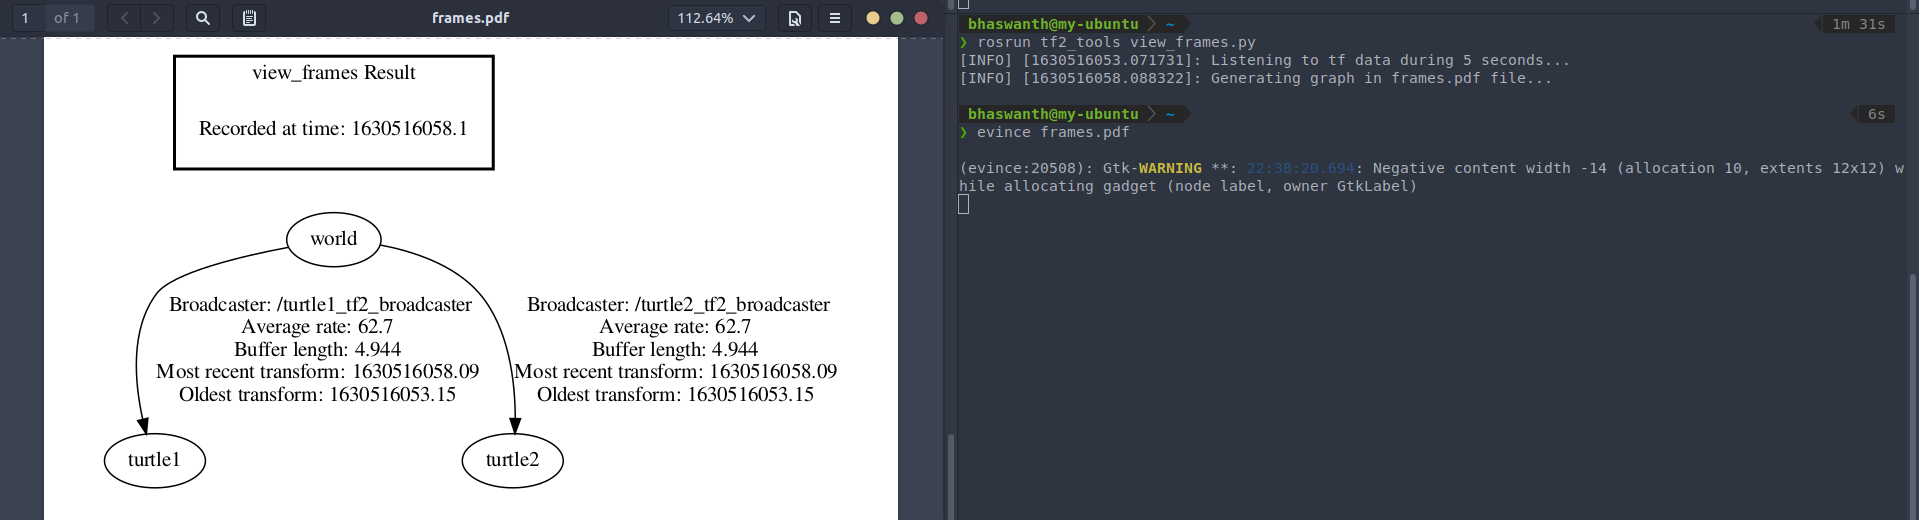
On opening the pdf, we see a very simple tree diagram that depicts three frames - world frame, turtle1 frame, and turtle2 frame.
- The world frame is transformed to the turtle1 and to turtle2, seperately.
- We can see the Average rate, which is the publishing rate
- We can also see the most recent transform number, which should more or less coincide with the recording time (otherwise it is not publishing correctly)
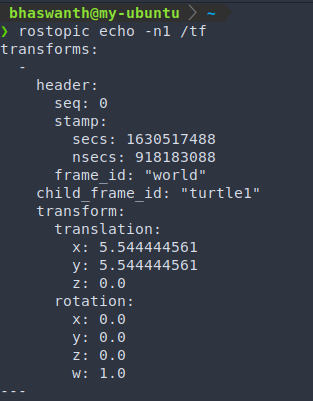
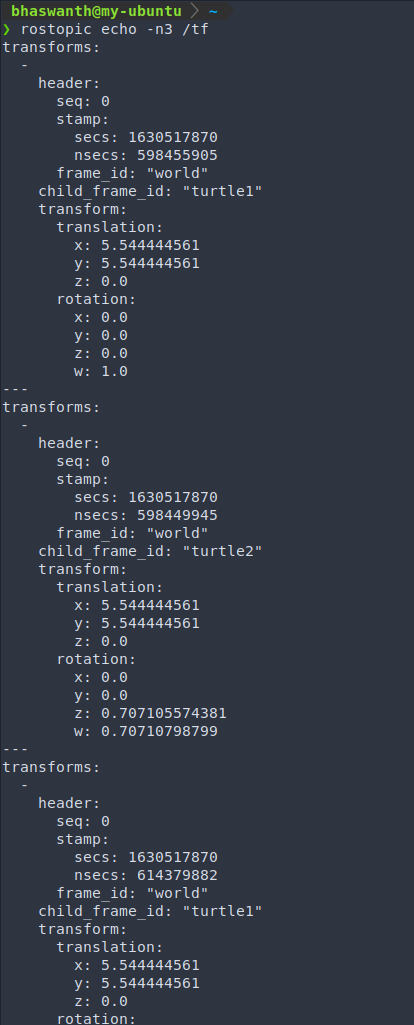
You can also listen to the TF being published, using the echo. There is a topic named /tf where ALL the TF are published. In simple systems like this one there is no problem, but as the system becomes more sophisticated, the quantity of data can be overwhelming. To tackle this, tf2 library provides you with tools that filters which tranformation you are interested in and just shows you that one.

Running the following commands shows you the TF of the respective turtle only w.r.t the world frame.
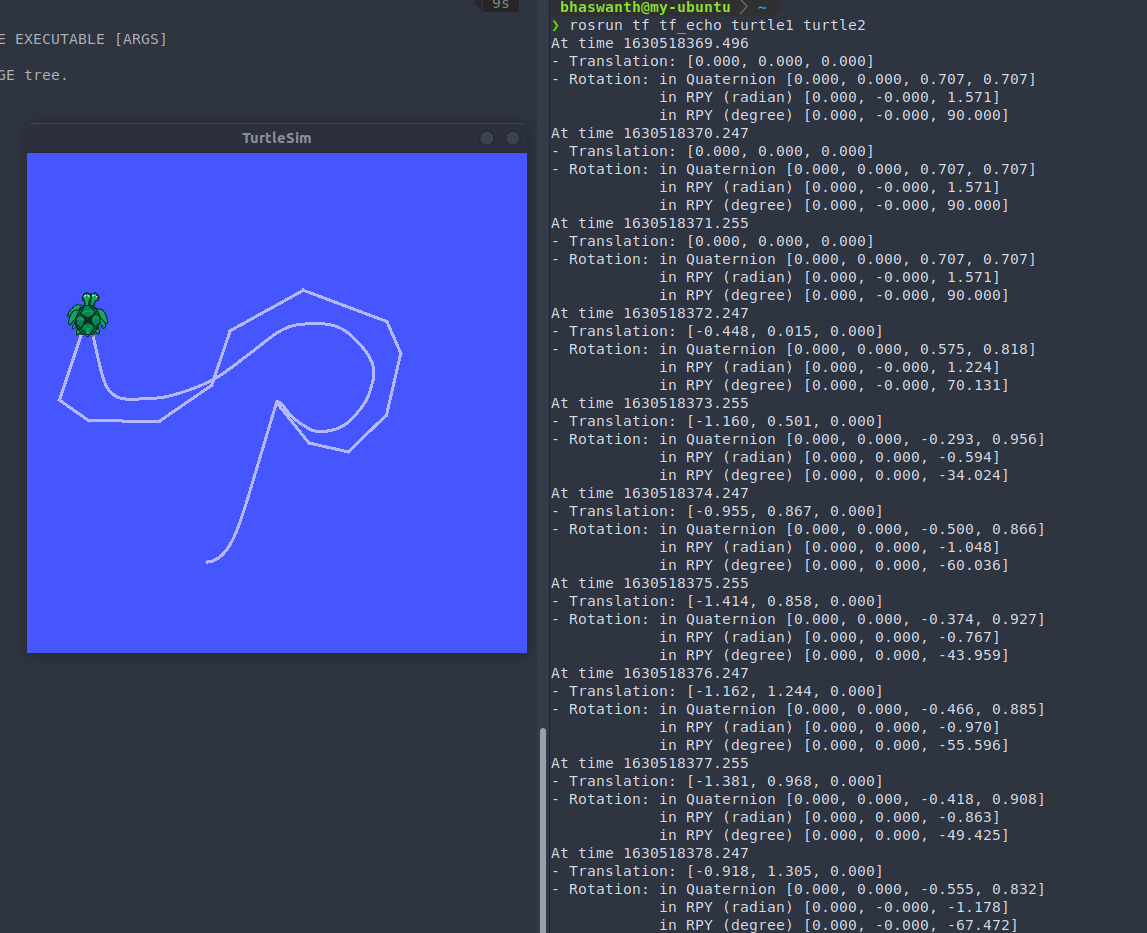
tf_echo:
If you want to see the transform change as the two turtles move relative to each other, you can use tf_echo. tf_echo reports the transform between any two frames broadcast over ROS.
Syntax: rosrun tf tf_echo [reference_frame] [target_frame]
On running rosrun tf tf_echo turtle1 turtle2 you get the following information:
- Relative translation between the two turtles
- Relative rotation between the two turtles in terms of Quaternions, RPY (Roll Pitch Yaw)
tf_monitor:
7.2.2 Better visualization - rviz
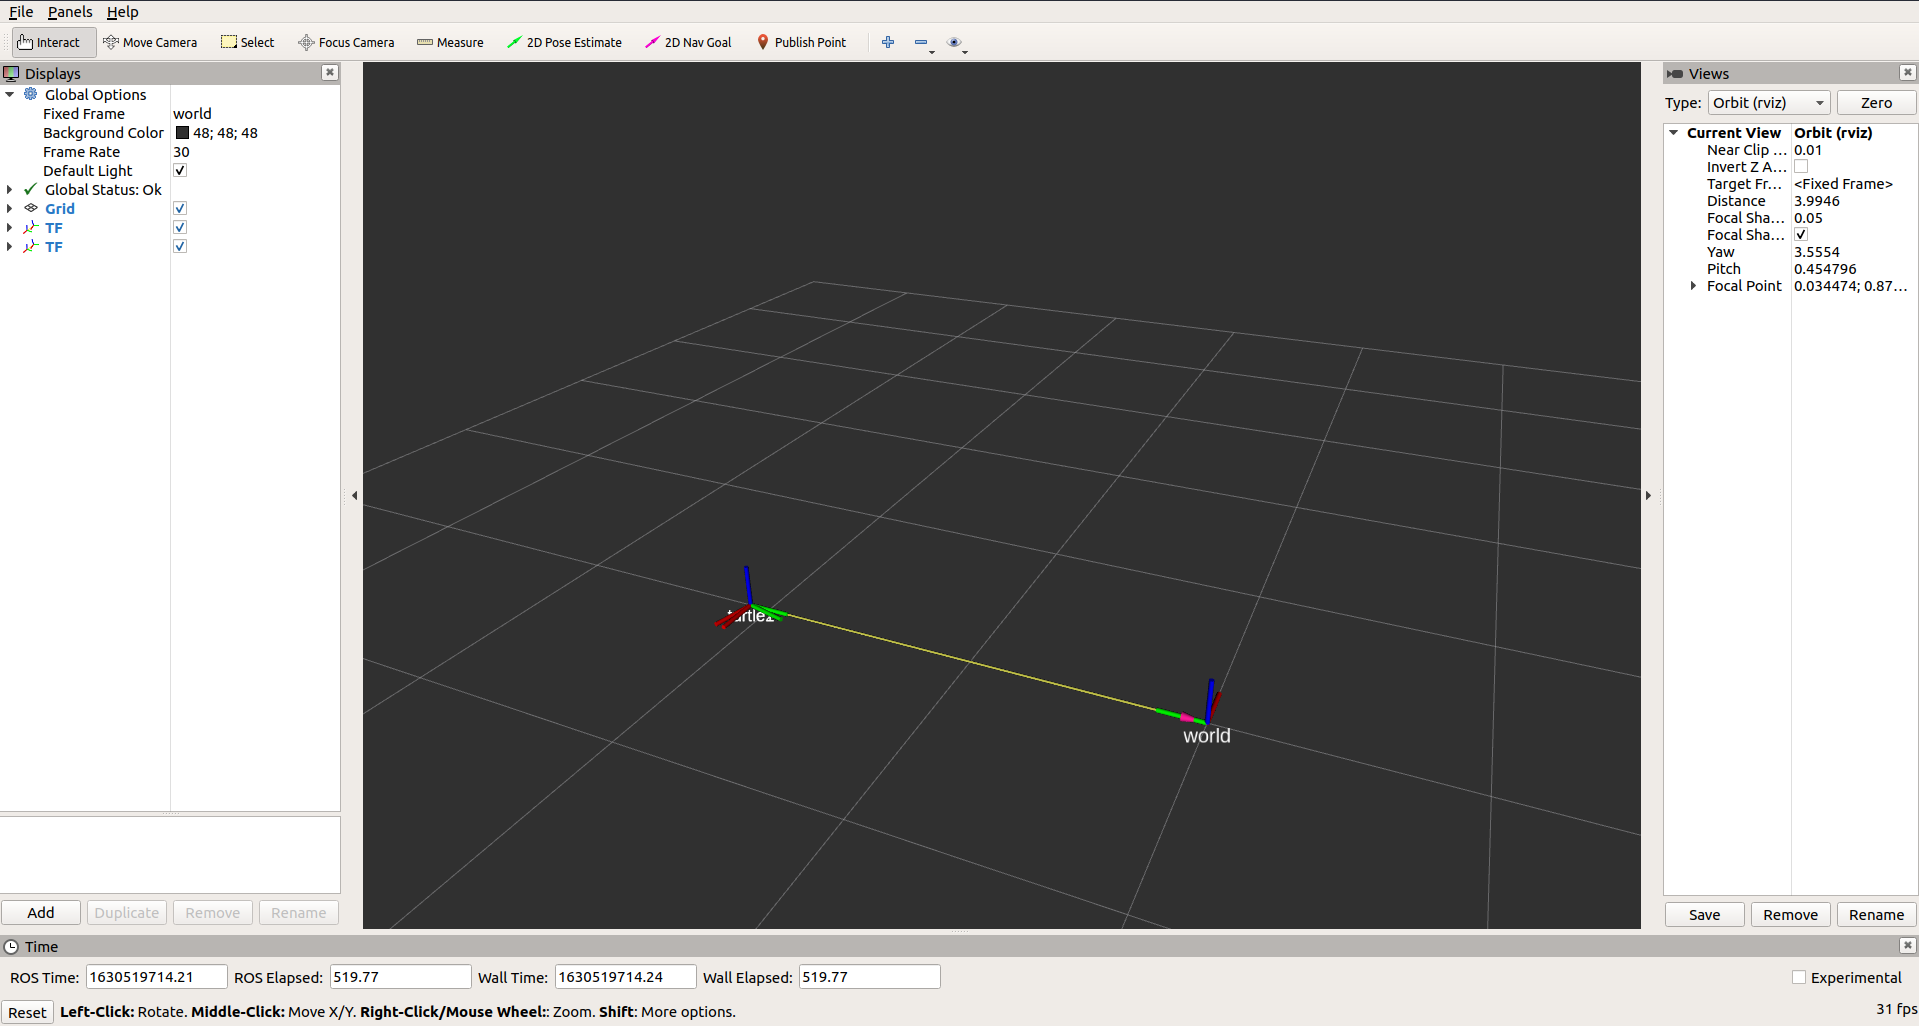
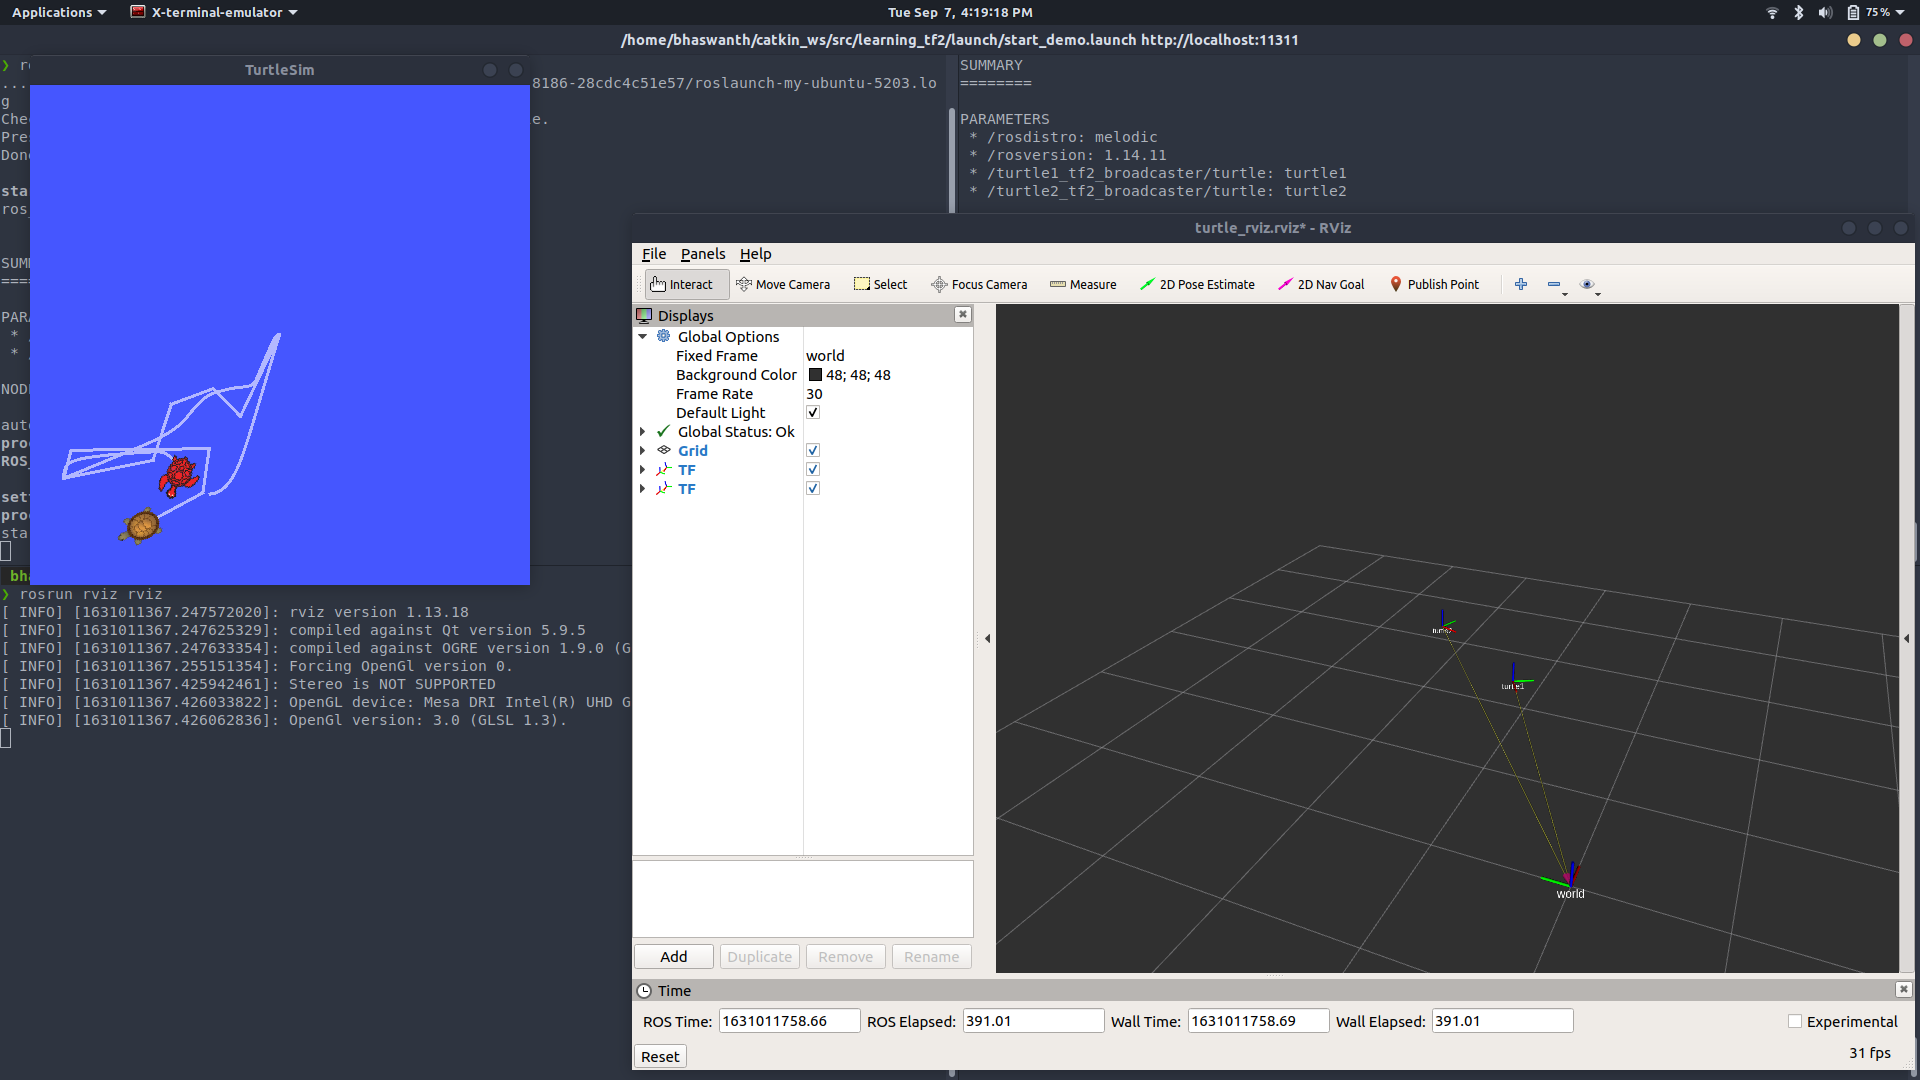
rviz is a visualization tool that is useful for examining tf2 frames.
To open the turtle_tf2 file on rviz, enter the command: rosrun rviz rviz and open the relevant file. This is how your rviz environment will typically look like.
Reference - https://youtu.be/Ra-nXIfPWdg
7.3 Quaternion and Roll-Pitch-Yaw Conversion
1
2
3
4
5
6
7
8
9
10
11
12
13
14
15
16
17
18
19
20
21
22
23
24
25
26
27
28
#! /usr/bin/python2
import rospy
import tf2_ros
import tf
from geometry_msgs.msg import Twist
from nav_msgs.msg import Odometry
import math
roll = math.radians(30)
pitch = math.radians(50)
yaw = math.radians(75)
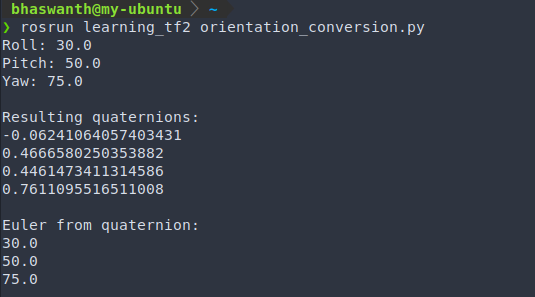
print('Roll: {}'.format(math.degrees(roll)))
print('Pitch: {}'.format(math.degrees(pitch)))
print('Yaw: {}'.format(math.degrees(yaw)))
quaternion = tf.transformations.quaternion_from_euler(roll, pitch, yaw)
print("\nResulting quaternions:")
for i in range(0, 4):
print(quaternion[i])
ori = tf.transformations.euler_from_quaternion(quaternion)
print('\nEuler from quaternion:')
for i in range(0, 3):
print(math.degrees(ori[i]))
Execution:
7.4 TF2 Publisher/Broadcaster
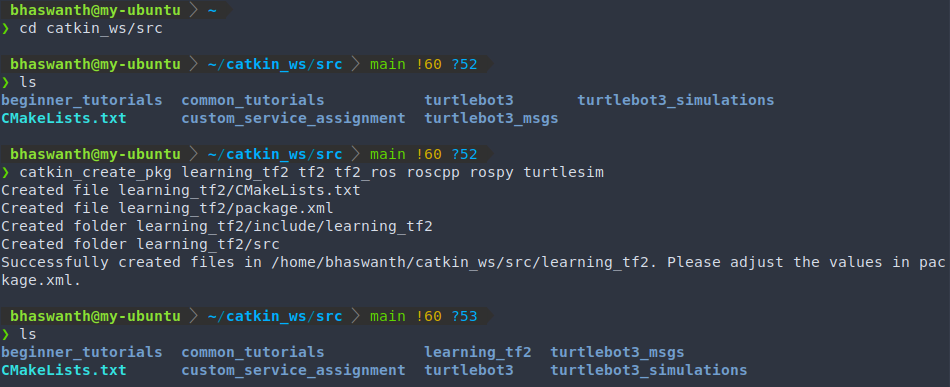
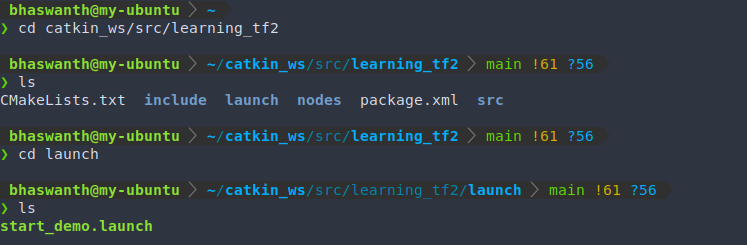
We shall first create a new catkin package called learning_tf2 to better understand and demonstrate writing code for publishers and subscribers.
Syntax to create the new package: catkin_create_pkg learning_tf2 tf2 tf2_ros roscpp rospy turtlesim
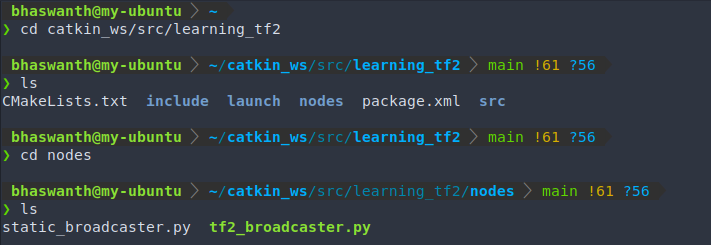
Create a new directory called nodes inside the learning_tf2 package. We will be storing all our python nodes here.
To create a broadcaster, make a new file called tf2_broadcaster.py under the nodes directory.
Code:
1
2
3
4
5
6
7
8
9
10
11
12
13
14
15
16
17
18
19
20
21
22
23
24
25
26
27
28
29
30
31
32
33
34
35
36
37
38
39
40
41
42
43
44
45
46
47
48
#! /usr/bin/python2
# import rospy
import rospy
# import tf2 module
import tf2_ros
# import tf
import tf
import geometry_msgs.msg
import turtlesim.msg
def turtle_func(msg, turtlename):
# TransformBroadcaster makes publishing of transforms easy. To use the TransformBroadcaster, we need to import the tf2_ros module.
br = tf2_ros.TransformBroadcaster()
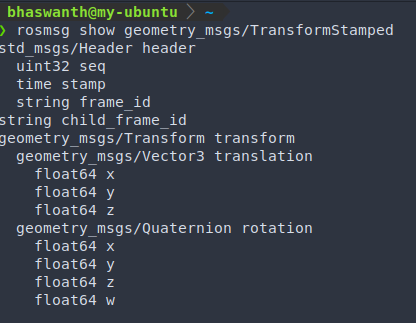
# We create a TransformStamped object which will contain the message to be published.
t = geometry_msgs.msg.TransformStamped()
# Before stuffing the actual transform values we need to give the TransformStamped object the appropriate metadata.
t.header.stamp = rospy.Time.now() # We need to give the transform being published a timestamp, which in our case will be the current time
t.header.frame_id = "world" # name of parent frame
t.child_frame_id = turtlename # name of child frame
t.transform.translation.x = msg.x
t.transform.translation.y = msg.y
t.transform.translation.z = 0.0
# convert angles from euler (radians/degrees) to quaternion
q = tf.transformations.quaternion_from_euler(0, 0, msg.theta)
t.transform.rotation.x = q[0]
t.transform.rotation.y = q[1]
t.transform.rotation.z = q[2]
t.transform.rotation.w = q[3]
br.sendTransform(t) # publish the transform
if __name__=='__main__':
rospy.init_node('tf2_broadcaster') # create node
turtlename = rospy.get_param("~turtle")
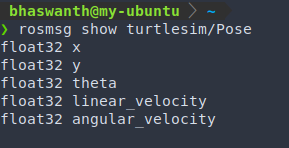
rospy.Subscriber('%s/pose' % turtlename,
turtlesim.msg.Pose,
turtle_func,
turtlename)
rospy.spin()
Execution: To run the broadcaster, we first need to create a launch file. Inside your package, create a folder called launch, create a file called start_demo.launch.
1
2
3
4
5
6
7
8
9
10
11
12
<launch>
  <node pkg="turtlesim" type="turtlesim_node" name="sim" />
  <node pkg="turtlesim" type="turtle_teleop_key" name="teleop" output="screen" />

  <node name="turtle1_tf2_broadcaster" pkg="learning_tf2" type="tf2_broadcaster.py" respawn="false" output="screen">
    <param name="turtle" type="string" value="turtle1" />
  </node>
  <node name="turtle2_tf2_broadcaster" pkg="learning_tf2" type="tf2_broadcaster.py" respawn="false" output="screen">
    <param name="turtle" type="string" value="turtle2" />
  </node>

</launch>
To execute, just run the command roslaunch learning_tf2 start_demo.launch.
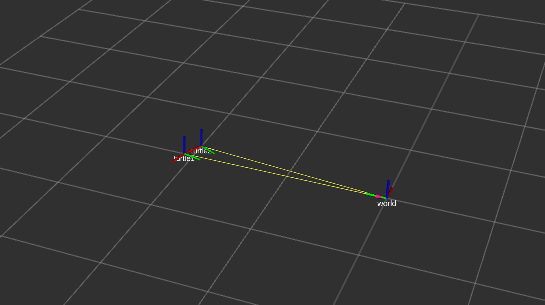
Rviz:
7.5 TF2 Subscriber/Listener
1
2
3
4
5
6
7
8
9
10
11
12
13
14
15
16
17
18
19
20
21
22
23
24
25
26
27
28
29
30
31
32
33
34
35
36
37
38
39
40
41
42
43
44
45
46
47
48
49
50
51
52
53
54
#! /usr/bin/python2

# import rospy
import rospy
# import tf2 module
import tf2_ros
# import math module
import math

from geometry_msgs.msg import Twist
from turtlesim.srv import Spawn

# initialize listener node
rospy.init_node("tf2_listener")

# A listener object is created. Once the listener is created, it starts receiving tf2 transformations, and buffers them for up to 10 seconds.
tfBuffer = tf2_ros.Buffer()
listener = tf2_ros.TransformListener(tfBuffer)

# Spawn another turtle in the same turtlesim node (Refer to https://github.com/Bhaswanth-A/ROS-Theory/blob/main/Services.md#571-spawning-2-turtles-in-the-same-node )
rospy.wait_for_service('spawn')
spawner = rospy.ServiceProxy('spawn', Spawn)
turtle_name = rospy.get_param('turtle', 'turtle2')
spawner(4.0, 2.0, 0.0, turtle_name)

pub = rospy.Publisher('%s/cmd_vel' % turtle_name,
                      Twist, latch=True, queue_size=1)


r = rospy.Rate(10)

while not rospy.is_shutdown():

    try:
        # Gets the transformation from source frame to target frame (change turtle1 to carrot1 for frames example)
        trans = tfBuffer.lookup_transform(turtle_name, 'turtle1', rospy.Time())

    except (tf2_ros.LookupException, tf2_ros.ConnectivityException, tf2_ros.ExtrapolationException):
        continue

    # some math
    angular = 4 * math.atan2(trans.transform.translation.y,
                             trans.transform.translation.x)
    linear = 0.5 * math.sqrt(trans.transform.translation.x **
                             2 + trans.transform.translation.y ** 2)

    cmd = Twist()
    cmd.linear.x = linear
    cmd.angular.z = angular

    # publish the pose
    pub.publish(cmd)

    r.sleep()

Execution:
Change the launch file start_demo.launch to this (only 1 line is added, nothing else is changed from before).
1
2
3
4
5
6
7
8
9
10
11
12
13
14
15
<launch>
  <node pkg="turtlesim" type="turtlesim_node" name="sim" />
  <node pkg="turtlesim" type="turtle_teleop_key" name="teleop" output="screen" />


  <node name="turtle1_tf2_broadcaster" pkg="learning_tf2" type="tf2_broadcaster.py" respawn="false" output="screen">
    <param name="turtle" type="string" value="turtle1" />
  </node>
  <node name="turtle2_tf2_broadcaster" pkg="learning_tf2" type="tf2_broadcaster.py" respawn="false" output="screen">
    <param name="turtle" type="string" value="turtle2" />
  </node>

  <node pkg="learning_tf2" type="tf2_listener.py" name="listener" output="screen" />

</launch>
To execute, just run the command roslaunch learning_tf2 start_demo.launch.
If you drive around turtle1 using your keyboard, you’ll find the second turtle following the first one.
Rviz:

7.6 Adding frames
Create a new file called add_frame_1.py under the nodes directory.
7.6.1 Example 1
Broadcaster
1
2
3
4
5
6
7
8
9
10
11
12
13
14
15
16
17
18
19
20
21
22
23
24
25
26
27
28
29
30
31
32
33
34
35
import rospy
import tf2_ros

from geometry_msgs.msg import TransformStamped

def frames():

    br = tf2_ros.TransformBroadcaster()

    t = TransformStamped()

    t.header.stamp = rospy.Time.now()
    t.header.frame_id = "turtle1"
    t.child_frame_id = "carrot1"

    rate = rospy.Rate(10.0)
    while not rospy.is_shutdown():

        t.header.stamp = rospy.Time.now()
        t.transform.translation.x = -2.0
        t.transform.translation.y = 0.0
        t.transform.translation.z = 0.0
        t.transform.rotation.x = 0.0
        t.transform.rotation.y = 0.0
        t.transform.rotation.z = 0.0
        t.transform.rotation.w = 1.0

        br.sendTransform(t)
        rate.sleep()


if __name__ == "__main__":
    rospy.init_node('frames')

    frames()
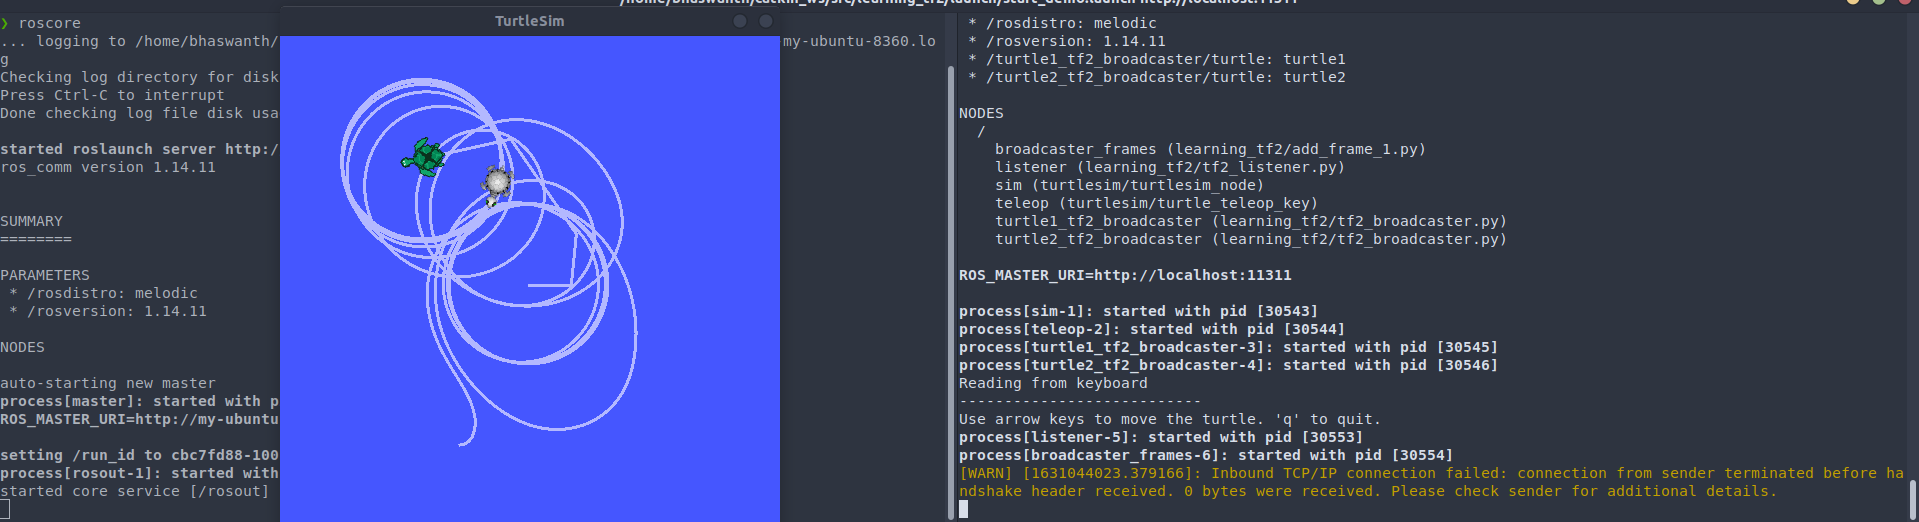
We create a new transform, from the parent “turtle1” to the new child “carrot1”. The carrot1 frame is 2 meters offset from the turtle1 frame.
Listener
1
2
3
4
5
6
7
8
9
10
11
12
13
14
15
16
17
18
19
20
21
22
23
24
25
26
27
28
29
30
31
32
33
34
35
36
37
38
39
40
41
42
43
44
45
46
#! /usr/bin/python2

import rospy
import tf2_ros
import math

from geometry_msgs.msg import Twist
from turtlesim.srv import Spawn

rospy.init_node("tf2_listener")

tfBuffer = tf2_ros.Buffer()
listener = tf2_ros.TransformListener(tfBuffer)

rospy.wait_for_service('spawn')
spawner = rospy.ServiceProxy('spawn', Spawn)
turtle_name = rospy.get_param('turtle', 'turtle2')
spawner(4.0, 2.0, 0.0, turtle_name)

pub = rospy.Publisher('%s/cmd_vel' % turtle_name,
                      Twist, latch=True, queue_size=1)


r = rospy.Rate(10)

while not rospy.is_shutdown():

    try:
		# parent frame changed to carrot1
        trans = tfBuffer.lookup_transform(turtle_name, 'carrot1', rospy.Time())

    except (tf2_ros.LookupException, tf2_ros.ConnectivityException, tf2_ros.ExtrapolationException):
        continue

    angular = 4 * math.atan2(trans.transform.translation.y,
                             trans.transform.translation.x)
    linear = 0.5 * math.sqrt(trans.transform.translation.x **
                             2 + trans.transform.translation.y ** 2)

    cmd = Twist()
    cmd.linear.x = linear
    cmd.angular.z = angular

    pub.publish(cmd)

    r.sleep()
Launch file
1
2
3
4
5
6
7
8
9
10
11
12
13
14
15
16
17
<launch>
  <node pkg="turtlesim" type="turtlesim_node" name="sim" />
  <node pkg="turtlesim" type="turtle_teleop_key" name="teleop" output="screen" />


  <node name="turtle1_tf2_broadcaster" pkg="learning_tf2" type="tf2_broadcaster.py" respawn="false" output="screen">
    <param name="turtle" type="string" value="turtle1" />
  </node>
  <node name="turtle2_tf2_broadcaster" pkg="learning_tf2" type="tf2_broadcaster.py" respawn="false" output="screen">
    <param name="turtle" type="string" value="turtle2" />
  </node>

  <node pkg="learning_tf2" type="tf2_listener.py" name="listener" output="screen" />

  <node pkg="learning_tf2" type="add_frame_1.py" name="broadcaster_frames" output="screen" />

</launch>
7.6.2 Example 2
Broadcaster
1
2
3
4
5
6
7
8
9
10
11
12
13
14
15
16
17
18
19
20
21
22
23
24
25
26
27
28
29
30
31
32
33
34
35
36
37
38
39
40
#! /usr/bin/python2

import rospy
import tf2_ros
import math

from geometry_msgs.msg import TransformStamped


def frames():

    br = tf2_ros.TransformBroadcaster()

    t = TransformStamped()

    t.header.stamp = rospy.Time.now()
    t.header.frame_id = "turtle1"
    t.child_frame_id = "carrot1"

    rate = rospy.Rate(10.0)
    while not rospy.is_shutdown():
        x = rospy.Time.now().to_sec() * math.pi

        t.header.stamp = rospy.Time.now()
        t.transform.translation.x = 10 * math.sin(x)
        t.transform.translation.y = 10 * math.cos(x)
        t.transform.translation.z = 0.0
        t.transform.rotation.x = 0.0
        t.transform.rotation.y = 0.0
        t.transform.rotation.z = 0.0
        t.transform.rotation.w = 1.0

        br.sendTransform(t)
        rate.sleep()


if __name__ == "__main__":
    rospy.init_node('frames')

    frames()
Instead of a fixed definition of our x and y offsets, we are using the sin and cos functions on the current time so that the offset of carrot1 is constantly changing.
Listener
1
2
3
4
5
6
7
8
9
10
11
12
13
14
15
16
17
18
19
20
21
22
23
24
25
26
27
28
29
30
31
32
33
34
35
36
37
38
39
40
41
42
43
44
45
46
#! /usr/bin/python2

import rospy
import tf2_ros
import math

from geometry_msgs.msg import Twist
from turtlesim.srv import Spawn

rospy.init_node("tf2_listener")

tfBuffer = tf2_ros.Buffer()
listener = tf2_ros.TransformListener(tfBuffer)

rospy.wait_for_service('spawn')
spawner = rospy.ServiceProxy('spawn', Spawn)
turtle_name = rospy.get_param('turtle', 'turtle2')
spawner(4.0, 2.0, 0.0, turtle_name)

pub = rospy.Publisher('%s/cmd_vel' % turtle_name,
                      Twist, latch=True, queue_size=1)


r = rospy.Rate(10)

while not rospy.is_shutdown():

    try:
		# parent frame changed to carrot1
        trans = tfBuffer.lookup_transform(turtle_name, 'carrot1', rospy.Time())

    except (tf2_ros.LookupException, tf2_ros.ConnectivityException, tf2_ros.ExtrapolationException):
        continue

    angular = 4 * math.atan2(trans.transform.translation.y,
                             trans.transform.translation.x)
    linear = 0.5 * math.sqrt(trans.transform.translation.x **
                             2 + trans.transform.translation.y ** 2)

    cmd = Twist()
    cmd.linear.x = linear
    cmd.angular.z = angular

    pub.publish(cmd)

    r.sleep()
Launch file
1
2
3
4
5
6
7
8
9
10
11
12
13
14
15
16
17
<launch>
  <node pkg="turtlesim" type="turtlesim_node" name="sim" />
  <node pkg="turtlesim" type="turtle_teleop_key" name="teleop" output="screen" />


  <node name="turtle1_tf2_broadcaster" pkg="learning_tf2" type="tf2_broadcaster.py" respawn="false" output="screen">
    <param name="turtle" type="string" value="turtle1" />
  </node>
  <node name="turtle2_tf2_broadcaster" pkg="learning_tf2" type="tf2_broadcaster.py" respawn="false" output="screen">
    <param name="turtle" type="string" value="turtle2" />
  </node>

  <node pkg="learning_tf2" type="tf2_listener.py" name="listener" output="screen" />

  <node pkg="learning_tf2" type="add_frame_1.py" name="broadcaster_frames" output="screen" />

</launch>

7.7 Time travel
Let us see how we can get transformations from the past.
7.7.1 Example 1
Make the following changes in the listener file.
1
2
3
4
5
6
7
8
while not rospy.is_shutdown():
    try:
        past = rospy.Time.now() - rospy.Duration(5)
        trans = tfBuffer.lookup_transform(turtle_name,'turtle1',past)

    except (tf2_ros.LookupException, tf2_ros.ConnectivityException, tf2_ros.ExtrapolationException):
        continue
The above code asks for the pose of turtle1 5 seconds ago relative to turtle2 5 seconds ago. But this is not what we want. We want the pose of turtle1 5 seconds ago relative to the current pose of turtle2.
7.7.2 Example 2
1
2
3
4
5
6
7
while not rospy.is_shutdown():
    try:
        past = rospy.Time.now() - rospy.Duration(5)
        trans = tfBuffer.lookup_transform_full(turtle_name, rospy.Time.now(), 'turtle1', past, 'world', rospy.Duration(1))

    except (tf2_ros.LookupException, tf2_ros.ConnectivityException, tf2_ros.ExtrapolationException):
        continue
The above code computes the pose of turtle1 5 seconds ago relative to the current pose of turtle2.